In this Angular tutorial, we will create an Angular app that basically implements a CRUD operation. This app will use REST API that gets the required data, posts the data, puts changes, and deletes data. So, we will learn how to use HTTPClient to access REST API, use Angular Form, use Routing and Navigation, and create a simple Calendar.
In the end, the final Angular web app will look like this.
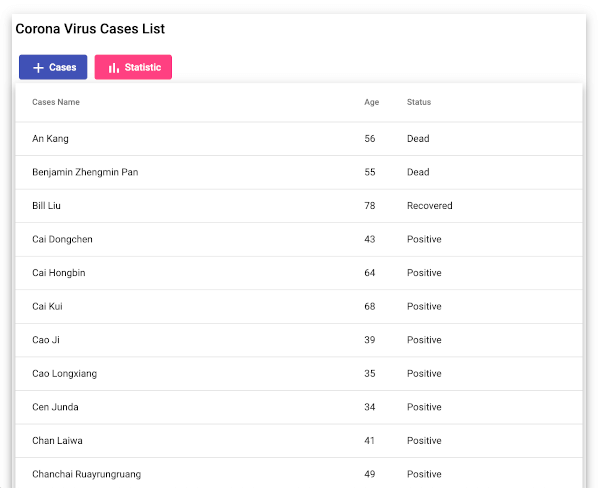
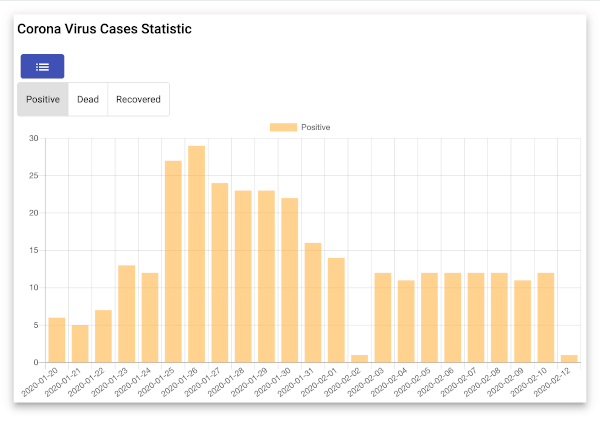
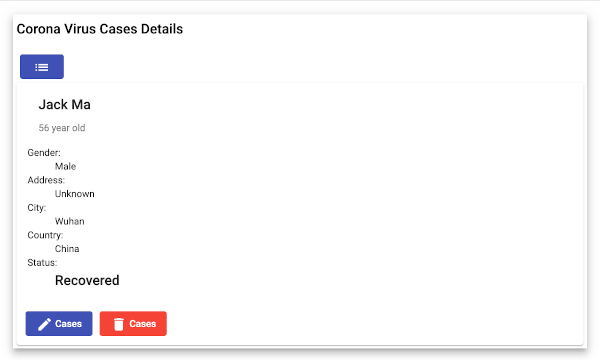
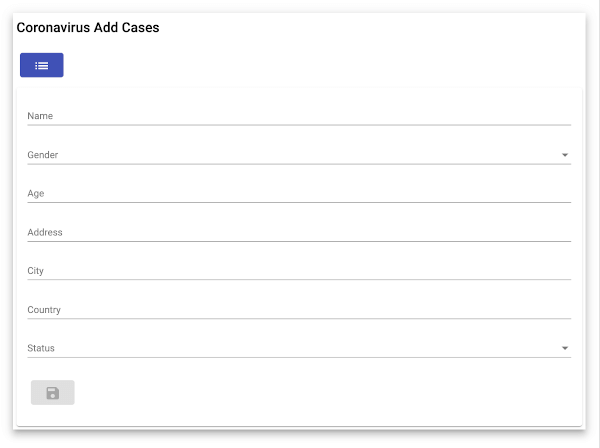
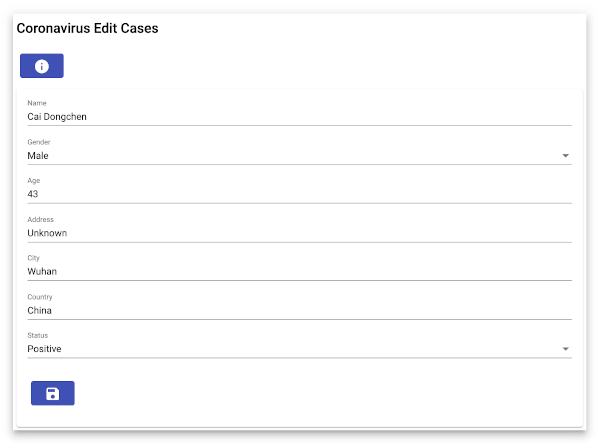
The following tools, frameworks, and modules are required for this tutorial:
- Node.js (recommended version)
- Angular
- REST API
- Terminal (Mac/Linux) or Node Command Line (Windows)
- IDE or Text Editor (We are using Visual Studio Code)
We already provided the REST API for the sample app, you can just clone, install NPM, run the MongoDB server, and run the Express/MongoDB REST API server. We assume that you have installed Node.js. Now, we need to check the Node.js and NPM versions. Open the terminal or Node command line, then type these commands.
node -v
v18.14.2
npm -v
9.5.0
You can watch the video tutorial about this on our YouTube channel here https://youtu.be/R4224MsyckA.
Step #1. Create a New Angular App
We will create a new Angular App using Angular CLI. For that, we need to install or update the @angular/cli first to the latest version.
npm install -g @angular/cliNext, create a new Angular app by running this command.
ng new coronavirus-casesIf you get the question below, choose `Yes` and `SCSS` (or whatever you like to choose).
? Would you like to add Angular routing? Yes
? Which stylesheet format would you like to use? SCSS   [ https://sass-lang.com/
documentation/syntax#scss
             ]
Next, go to the newly created Angular project folder.
cd coronavirus-casesOpen this Angular project with your IDE or Text editor. To use VSCode, type this command.
code .Type this command to run the Angular app for the first time.
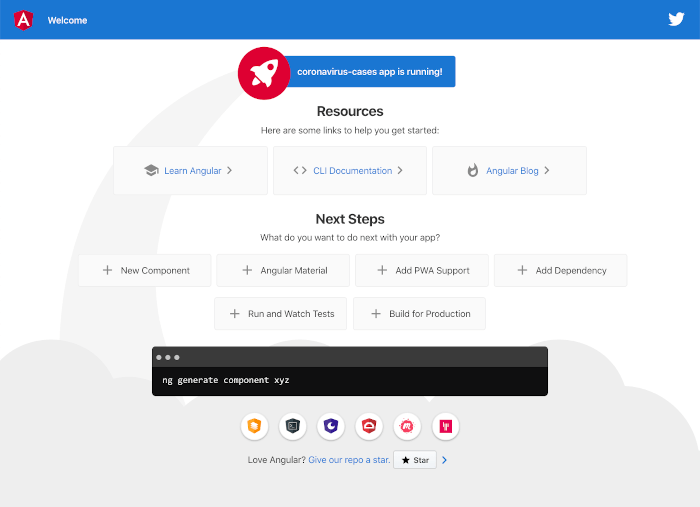
ng serve --openUsing the "--open" parameter will automatically open this Angular app in the default browser. Now, the Angular initial app looks like this.
Step #2. Add the Angular Routing and Navigation
As you see in the first step of creating an Angular app. We already add the Angular Routing for this Angular app. Next, we just add the required Angular components for this Angular app. Just type these commands to generate them.
ng g component cases
ng g component cases-details
ng g component add-cases
ng g component edit-cases
ng g component cases-stat
Those components will automatically be registered to the app.module.ts. Next, open and edit `src/app/app-routing.module.ts` then add these imports.
import { CasesComponent } from './cases/cases.component';
import { CasesDetailsComponent } from './cases-details/cases-details.component';
import { CasesStatComponent } from './cases-stat/cases-stat.component';
import { AddCasesComponent } from './add-cases/add-cases.component';
import { EditCasesComponent } from './edit-cases/edit-cases.component';
Add these arrays to the existing routes constant that contain routes for the above-added components.
const routes: Routes = [
  {
    path: 'cases',
    component: CasesComponent,
    data: { title: 'List of Cases' }
  },
  {
    path: 'cases-details/:id',
    component: CasesDetailsComponent,
    data: { title: 'Cases Details' }
  },
  {
    path: 'cases-stat',
    component: CasesStatComponent,
    data: { title: 'Cases Statistic' }
  },
  {
    path: 'add-cases',
    component: AddCasesComponent,
    data: { title: 'Add Cases' }
  },
  {
    path: 'edit-cases/:id',
    component: EditCasesComponent,
    data: { title: 'Edit Cases' }
  },
  { path: '',
    redirectTo: '/cases',
    pathMatch: 'full'
  }
];
Open and edit `src/app/app.component.html` and you will see the existing router outlet. Next, modify this HTML page to fit the CRUD page.
<div class="container">
  <router-outlet></router-outlet>
</div>
Open and edit `src/app/app.component.scss` then replace all SASS codes with this.
.container {
  padding: 20px;
}
Step #3. Add the Angular Service
All access (POST, GET, PUT, DELETE) to the REST API will be put in the Angular Service. The response from the REST API emitted by Observable can subscribe and read from the Components. Before creating a service for REST API access, first, we have to install or register `HttpClientModule`. Open and edit `src/app/app.module.ts` then add these imports of FormsModule, ReactiveFormsModule (@angular/forms), and HttpClientModule (@angular/common/http).
import { FormsModule, ReactiveFormsModule } from '@angular/forms';
import { HttpClientModule } from '@angular/common/http';
Add it to `@NgModule` imports after `BrowserModule`.
imports: [
  BrowserModule,
  FormsModule,
  ReactiveFormsModule,
  HttpClientModule,
  AppRoutingModule
],
We will use the type specifier to get a typed result object. Generate the new class files.
ng g class cases
ng g class statistic
Add these lines of typescript codes to the body of the cases class.
export class Cases {
  _id: string = '';
  name: string = '';
  gender: string = '';
  age: number = 0;
  address: string = '';
  city: string = '';
  country: string = '';
  status: string = '';
  updated: Date = new Date();
}
Add these lines of typescript codes to the body of the statistic class.
export class Statistic {
  _id: any;
  count: number = 0;
}
Next, generate an Angular service by typing this command.
ng g service apiNext, open and edit `src/app/api.service.ts` then add these imports.
import { Observable, of, throwError } from 'rxjs';
import { HttpClient, HttpHeaders, HttpErrorResponse } from '@angular/common/http';
import { catchError, tap, map } from 'rxjs/operators';
import { Cases } from './cases';
import { Statistic } from './statistic';
Add these constants before the `@Injectable`.
const httpOptions = {
  headers: new HttpHeaders({'Content-Type': 'application/json'})
};
const apiUrl = '/api/';
Inject the `HttpClient` module into the constructor.
constructor(private http: HttpClient) { }Add the error handler function that returns as an Observable.
private handleError<T> (operation = 'operation', result?: T) {
  return (error: any): Observable<T> => {

    // TODO: send the error to remote logging infrastructure
    console.error(error); // log to console instead

    // Let the app keep running by returning an empty result.
    return of(result as T);
  };
}
Add the functions for all CRUD (create, read, update, delete) REST API calls of cases and statistic data.
  getCases(): Observable<Cases[]> {
    return this.http.get<Cases[]>(`${apiUrl}`)
      .pipe(
        tap(cases => console.log('fetched cases')),
        catchError(this.handleError('getCases', []))
      );
  }

  getCasesById(id: string): Observable<Cases> {
    const url = `${apiUrl}/${id}`;
    return this.http.get<Cases>(url).pipe(
      tap(_ => console.log(`fetched cases id=${id}`)),
      catchError(this.handleError<Cases>(`getCasesById id=${id}`))
    );
  }

  addCases(cases: Cases): Observable<Cases> {
    return this.http.post<Cases>(apiUrl, cases, httpOptions).pipe(
      tap((c: Cases) => console.log(`added cases w/ id=${c._id}`)),
      catchError(this.handleError<Cases>('addCases'))
    );
  }

  updateCases(id: string, cases: Cases): Observable<any> {
    const url = `${apiUrl}/${id}`;
    return this.http.put(url, cases, httpOptions).pipe(
      tap(_ => console.log(`updated cases id=${id}`)),
      catchError(this.handleError<any>('updateCases'))
    );
  }

  deleteCases(id: string): Observable<Cases> {
    const url = `${apiUrl}/${id}`;
    return this.http.delete<Cases>(url, httpOptions).pipe(
      tap(_ => console.log(`deleted cases id=${id}`)),
      catchError(this.handleError<Cases>('deleteCases'))
    );
  }

  getStatistic(status: string): Observable<Statistic[]> {
    const url = `${apiUrl}/daily/${status}`;
    return this.http.get<Statistic[]>(url).pipe(
      tap(cases => console.log('fetched statistics')),
      catchError(this.handleError('getStatistic', []))
    );
  }
You can find more examples of Angular Observable and RXJS here https://www.djamware.com/post/5da31946ae418d042e1aef1d/angular-8-tutorial-observable-and-rxjs-examples.
Step #4. Display List of Data using Angular Material
We will display the list of data using the Angular Material Table. The data published from the API service is read by subscribing as a Cases model in the Angular component. For that, open and edit `src/app/cases/cases.component.ts` then add this import of the previously created API Service.
import { ApiService } from '../api.service';Next, inject the API Service into the constructor.
constructor(private api: ApiService) { }Next, for the user interface (UI) we will use Angular Material and CDK. There's a CLI for generating a Material component like Table as a component, but we will create or add the Table component from scratch to the existing component. Type this command to install Angular Material (@angular/material).
ng add @angular/materialIf there are questions like below, just use the default and "Yes" answer.
? Choose a prebuilt theme name, or "custom" for a custom theme: Indigo/Pink        [ Preview: http
s://material.angular.io?theme=indigo-pink ]
? Set up global Angular Material typography styles? Yes
? Set up browser animations for Angular Material? Yes
We will register all required Angular Material components or modules to `src/app/app.module.ts`. Open and edit that file then add these imports of required Angular Material Components.
import { MatInputModule } from '@angular/material/input';
import { MatPaginatorModule } from '@angular/material/paginator';
import { MatProgressSpinnerModule } from '@angular/material/progress-spinner';
import { MatSortModule } from '@angular/material/sort';
import { MatTableModule } from '@angular/material/table';
import { MatIconModule } from '@angular/material/icon';
import { MatButtonModule } from '@angular/material/button';
import { MatCardModule } from '@angular/material/card';
import { MatFormFieldModule } from '@angular/material/form-field';
import { MatSliderModule } from '@angular/material/slider';
import { MatSlideToggleModule } from '@angular/material/slide-toggle';
import { MatButtonToggleModule } from '@angular/material/button-toggle';
import { MatSelectModule } from '@angular/material/select';
Register the above modules to `@NgModule` imports.
  imports: [
    ...
    MatInputModule,
    MatPaginatorModule,
    MatProgressSpinnerModule,
    MatSortModule,
    MatTableModule,
    MatIconModule,
    MatButtonModule,
    MatCardModule,
    MatFormFieldModule,
    MatSliderModule,
    MatSlideToggleModule,
    MatButtonToggleModule,
    MatSelectModule,
  ],
Next, back to `src/app/cases/cases.component.ts` then add this import.
import { Cases } from '../cases';Declare the variables of Angular Material Table Data Source before the constructor.
  displayedColumns: string[] = ['name', 'age', 'status'];
  data: Cases[] = [];
  isLoadingResults = true;
Modify the `ngOnInit` function to get a list of cases immediately.
  ngOnInit(): void {
    this.api.getCases().subscribe({
      next: (res) => {
        this.data = res;
        console.log(this.data);
        this.isLoadingResults = false;
      },
      error: (e) => {
        console.log(e);
        this.isLoadingResults = false;
      },
      complete: () => console.info('complete')
    });
  }
Next, open and edit `src/app/cases/cases.component.html` then replace all HTML tags with these Angular Material tags.
<div class="example-container mat-elevation-z8">
  <h2>Corona Virus Cases List</h2>
  <div class="example-loading-shade"
       *ngIf="isLoadingResults">
    <mat-spinner *ngIf="isLoadingResults"></mat-spinner>
  </div>
  <div class="button-row">
    <a mat-flat-button color="primary" [routerLink]="['/add-cases']"><mat-icon>add</mat-icon> Cases</a>
    <a mat-flat-button color="accent" [routerLink]="['/cases-stat']"><mat-icon>bar_chart</mat-icon> Statistic</a>
  </div>
  <div class="mat-elevation-z8">
    <table mat-table [dataSource]="data" class="example-table"
           matSort matSortActive="name" matSortDisableClear matSortDirection="asc">

      <!-- Cases Name Column -->
      <ng-container matColumnDef="name">
        <th mat-header-cell *matHeaderCellDef>Cases Name</th>
        <td mat-cell *matCellDef="let row">{{row.name}}</td>
      </ng-container>

      <!-- Cases Age Column -->
      <ng-container matColumnDef="age">
        <th mat-header-cell *matHeaderCellDef>Age</th>
        <td mat-cell *matCellDef="let row">{{row.age}}</td>
      </ng-container>

      <!-- Cases Status Column -->
      <ng-container matColumnDef="status">
        <th mat-header-cell *matHeaderCellDef>Status</th>
        <td mat-cell *matCellDef="let row">{{row.status}}</td>
      </ng-container>

      <tr mat-header-row *matHeaderRowDef="displayedColumns"></tr>
      <tr mat-row *matRowDef="let row; columns: displayedColumns;" [routerLink]="['/cases-details/', row._id]"></tr>
    </table>
  </div>
</div>
Finally, to make a little UI adjustment, open and edit `src/app/cases/cases.component.scss` then add these CSS codes.
/* Structure */
.example-container {
  position: relative;
  padding: 5px;
}

.example-table-container {
  position: relative;
  max-height: 400px;
  overflow: auto;
}

table {
  width: 100%;
}

.example-loading-shade {
  position: absolute;
  top: 0;
  left: 0;
  bottom: 56px;
  right: 0;
  background: rgba(0, 0, 0, 0.15);
  z-index: 1;
  display: flex;
  align-items: center;
  justify-content: center;
}

.example-rate-limit-reached {
  color: #980000;
  max-width: 360px;
  text-align: center;
}

/* Column Widths */
.mat-column-number,
.mat-column-state {
  max-width: 64px;
}

.mat-column-created {
  max-width: 124px;
}

.mat-flat-button {
  margin: 5px;
}
Step #5. Show and Delete Data Details using Angular Material
On the list page, there are 2 buttons to navigate to the Details and Statistics page. For the Details page, the button action also sends an ID parameter. Next, open and edit `src/app/cases-details/cases-details.component.ts`, then add these lines of imports.
import { ActivatedRoute, Router } from '@angular/router';
import { ApiService } from '../api.service';
import { Cases } from '../cases';
Inject the above modules into the constructor.
constructor(private route: ActivatedRoute, private api: ApiService, private router: Router) { }Declare the variables before the constructor for hold cases data that get from the API.
  cases: Cases = { _id: '', name: '', gender: '', age: 0, address: '', city: '', country: '', status: '', updated: new Date() };
  isLoadingResults = true;
Add a function for getting Cases data from the API.
  getCasesDetails(id: string) {
    this.api.getCasesById(id)
      .subscribe((data: any) => {
        this.cases = data;
        console.log(this.cases);
        this.isLoadingResults = false;
      });
  }
Call that function when the component is initiated.
  ngOnInit(): void {
    this.getCasesDetails(this.route.snapshot.params['id']);
  }
Add this function to delete a case.
  deleteCases(id: any) {
    this.isLoadingResults = true;
    this.api.deleteCases(id)
      .subscribe(res => {
          this.isLoadingResults = false;
          this.router.navigate(['/cases']);
        }, (err) => {
          console.log(err);
          this.isLoadingResults = false;
        }
      );
  }
For the view, open and edit `src/app/cases-details/cases-details.component.html` then replace all HTML tags with this.
<div class="example-container mat-elevation-z8">
  <h2>Corona Virus Cases Details</h2>
  <div class="example-loading-shade"
       *ngIf="isLoadingResults">
    <mat-spinner *ngIf="isLoadingResults"></mat-spinner>
  </div>
  <div class="button-row">
    <a mat-flat-button color="primary" [routerLink]="['/cases']"><mat-icon>list</mat-icon></a>
  </div>
  <mat-card class="example-card">
    <mat-card-header>
      <mat-card-title><h2>{{cases.name}}</h2></mat-card-title>
      <mat-card-subtitle>{{cases.age}} year old</mat-card-subtitle>
    </mat-card-header>
    <mat-card-content>
      <dl>
        <dt>Gender:</dt>
        <dd>{{cases.gender}}</dd>
        <dt>Address:</dt>
        <dd>{{cases.address}}</dd>
        <dt>City:</dt>
        <dd>{{cases.city}}</dd>
        <dt>Country:</dt>
        <dd>{{cases.country}}</dd>
        <dt>Status:</dt>
        <dd><h2>{{cases.status}}</h2></dd>
      </dl>
    </mat-card-content>
    <mat-card-actions>
      <a mat-flat-button color="primary" [routerLink]="['/edit-cases', cases._id]"><mat-icon>edit</mat-icon> Cases</a>
      <a mat-flat-button color="warn" (click)="deleteCases(cases._id)"><mat-icon>delete</mat-icon> Cases</a>
    </mat-card-actions>
  </mat-card>
</div>
Finally, open and edit `src/app/cases-details/cases-details.component.scss` then add these lines of CSS codes.
/* Structure */
.example-container {
  position: relative;
  padding: 5px;
}

.example-loading-shade {
  position: absolute;
  top: 0;
  left: 0;
  bottom: 56px;
  right: 0;
  background: rgba(0, 0, 0, 0.15);
  z-index: 1;
  display: flex;
  align-items: center;
  justify-content: center;
}

.mat-flat-button {
  margin: 5px;
}
Step #6. Show Statistics using Ng2Charts and Chart.js
We will use a bar chart to display the statistics of Coronavirus cases. So, we need to install Ng2Charts and Chart.js modules by typing this command.
npm i --save ng2-charts chart.jsNext, open and edit `src/app/app.module.ts` then add this import of ng2-charts.
import { NgChartsModule } from 'ng2-charts';Add this module to the @NgModule imports.
  imports: [
    ...
    NgChartsModule,
  ],
Next, open and edit `src/app/cases-stat/cases-stat.component.ts` then add these imports of chart.js ChartOptions, ChartType, ChartDataSets, ng2-charts Label, ApiService, and Statistic data type.
import { ChartOptions, ChartType, ChartDataset } from 'chart.js';
import { Label } from 'ng2-charts';
import { ApiService } from '../api.service';
import { Statistic } from '../statistic';
Declare these required variables before the constructor for building a bar chart.
  stats: Statistic[] = [];
  label = 'Positive';
  isLoadingResults = true;
  barChartOptions: ChartOptions = {
    responsive: true,
  };
  barChartLabels: Label[] = [];
  barChartType: ChartType = 'bar';
  barChartLegend = true;
  barChartPlugins = [];
  barChartData: ChartDataset[] = [{ data: [], backgroundColor: [], label: this.label }];
Inject ApiService to the constructor.
constructor(private api: ApiService) { }Add a function to load statistic data from REST API then implement it as a bar chart.
  getStatistic(status: string) {
    this.barChartData = [{ data: [], backgroundColor: [], label: this.label }];
    this.barChartLabels = [];
    this.api.getStatistic(status).subscribe({
      next: (res) => {
        this.stats = res;
        const chartdata: number[] = [];
        const chartcolor: string[] = [];
        this.stats.forEach((stat) => {
          this.barChartLabels.push(stat._id.date);
          chartdata.push(stat.count);
          if (this.label === 'Positive') {
            chartcolor.push('rgba(255, 165, 0, 0.5)');
          } else if (this.label === 'Dead') {
            chartcolor.push('rgba(255, 0, 0, 0.5)');
          } else {
            chartcolor.push('rgba(0, 255, 0, 0.5)');
          }
        });
        this.barChartData = [{ data: chartdata, backgroundColor: chartcolor, label: this.label }];
        this.isLoadingResults = false;
      },
      error: (e) => {
        console.log(e);
        this.isLoadingResults = false;
      },
      complete: () => console.info('complete')
    });
  }
Call that function to the NgOnInit function.
  ngOnInit(): void {
    this.getStatistic(this.label);
  }
Add a function to switch or reload statistic data by status value.
  changeStatus() {
    this.isLoadingResults = true;
    this.getStatistic(this.label);
  }
Next, open and edit `src/app/cases-stat/cases-stat.component.html` then replace all HTML tags with this implementation of an ng2-charts/Chart.js bar chart with statistic data.
<div class="example-container mat-elevation-z8">
  <h2>Corona Virus Cases Statistic</h2>
  <div class="example-loading-shade"
       *ngIf="isLoadingResults">
    <mat-spinner *ngIf="isLoadingResults"></mat-spinner>
  </div>
  <div class="button-row">
    <a mat-flat-button color="primary" [routerLink]="['/cases']"><mat-icon>list</mat-icon></a>
  </div>
  <div class="button-row">
    <mat-button-toggle-group name="status" aria-label="Status" [(ngModel)]="label" (ngModelChange)="changeStatus()">
      <mat-button-toggle value="Positive">Positive</mat-button-toggle>
      <mat-button-toggle value="Dead">Dead</mat-button-toggle>
      <mat-button-toggle value="Recovered">Recovered</mat-button-toggle>
    </mat-button-toggle-group>
  </div>
  <div style="display: block;">
    <canvas baseChart
      [datasets]="barChartData"
      [labels]="barChartLabels"
      [options]="barChartOptions"
      [plugins]="barChartPlugins"
      [legend]="barChartLegend"
      [chartType]="barChartType">
    </canvas>
  </div>
</div>
Finally, give it a little style by modifying `src/app/cases-stat/cases-stat.component.scss` with these.
/* Structure */
.example-container {
  position: relative;
  padding: 5px;
}

.example-loading-shade {
  position: absolute;
  top: 0;
  left: 0;
  bottom: 56px;
  right: 0;
  background: rgba(0, 0, 0, 0.15);
  z-index: 1;
  display: flex;
  align-items: center;
  justify-content: center;
}

.mat-flat-button {
  margin: 5px;
}
Step #7. Add Data using Angular Material Form
To create a form for adding a Coronavirus case, open and edit `src/app/add-cases/add-cases.component.ts` then add these imports.
import { Router } from '@angular/router';
import { ApiService } from '../api.service';
import { FormControl, FormGroupDirective, FormBuilder, FormGroup, NgForm, Validators } from '@angular/forms';
import { ErrorStateMatcher } from '@angular/material/core';
Inject the above modules into the constructor.
constructor(private router: Router, private api: ApiService, private formBuilder: FormBuilder) { }Declare variables for the Form Group and all of the required fields inside the form before the constructor.
  casesForm: FormGroup;
  name = '';
  gender = '';
  age: number = null;
  address = '';
  city = '';
  country = '';
  status = '';
  statusList = ['Positive', 'Dead', 'Recovered'];
  genderList = ['Male', 'Female'];
  isLoadingResults = false;
  matcher = new MyErrorStateMatcher();
Add initial validation for each field in the constructor body.
  constructor(private router: Router, private api: ApiService, private formBuilder: FormBuilder) {
    this.casesForm = this.formBuilder.group({
      name : [null, Validators.required],
      gender : [null, Validators.required],
      age : [null, Validators.required],
      address : [null, Validators.required],
      city : [null, Validators.required],
      country : [null, Validators.required],
      status : [null, Validators.required]
    });
  }
Create a function for submitting or POST case forms.
  onFormSubmit() {
    this.isLoadingResults = true;
    this.api.addCases(this.casesForm.value).subscribe({
      next: (res) => {
        const id = res._id;
        this.isLoadingResults = false;
        this.router.navigate(['/cases-details', id]);
      },
      error: (e) => {
        console.log(e);
          this.isLoadingResults = false;
      },
      complete: () => console.info('complete')
    });
  }
Create a new class before the main class `@Components`.
/** Error when invalid control is dirty, touched, or submitted. */
export class MyErrorStateMatcher implements ErrorStateMatcher {
  isErrorState(control: FormControl | null, form: FormGroupDirective | NgForm | null): boolean {
    const isSubmitted = form && form.submitted;
    return !!(control && control.invalid && (control.dirty || control.touched || isSubmitted));
  }
}
Next, open and edit `src/app/add-cases/add-cases.component.html` then replace all HTML tags with this.
<div class="example-container mat-elevation-z8">
  <h2>Coronavirus Add Cases</h2>
  <div class="example-loading-shade"
        *ngIf="isLoadingResults">
    <mat-spinner *ngIf="isLoadingResults"></mat-spinner>
  </div>
  <div class="button-row">
    <a mat-flat-button color="primary" [routerLink]="['/cases']"><mat-icon>list</mat-icon></a>
  </div>
  <mat-card class="example-card">
    <form [formGroup]="casesForm" (ngSubmit)="onFormSubmit()">
      <mat-form-field class="example-full-width">
        <mat-label>Name</mat-label>
        <input matInput placeholder="Name" formControlName="name"
                [errorStateMatcher]="matcher">
        <mat-error *ngIf="casesForm.hasError('name') && !casesForm.hasError('required')">
          <span>Please enter Name</span>
        </mat-error>
      </mat-form-field>
      <mat-form-field class="example-full-width">
        <mat-label>Gender</mat-label>
        <mat-select formControlName="gender">
          <mat-option *ngFor="let gl of genderList" [value]="gl">
            {{gl}}
          </mat-option>
        </mat-select>
        <mat-error *ngIf="casesForm.hasError('gender') && !casesForm.hasError('required')">
          <span>Please choose Gender</span>
        </mat-error>
      </mat-form-field>
      <mat-form-field class="example-full-width">
        <mat-label>Age</mat-label>
        <input matInput type="number" placeholder="Age" formControlName="age"
                [errorStateMatcher]="matcher">
        <mat-error *ngIf="casesForm.hasError('age') && !casesForm.hasError('required')">
          <span>Please enter Age</span>
        </mat-error>
      </mat-form-field>
      <mat-form-field class="example-full-width">
        <mat-label>Address</mat-label>
        <input matInput placeholder="Address" formControlName="address"
                [errorStateMatcher]="matcher">
        <mat-error *ngIf="casesForm.hasError('address') && !casesForm.hasError('required')">
          <span>Please enter Address</span>
        </mat-error>
      </mat-form-field>
      <mat-form-field class="example-full-width">
        <mat-label>City</mat-label>
        <input matInput placeholder="City" formControlName="city"
                [errorStateMatcher]="matcher">
        <mat-error *ngIf="casesForm.hasError('city') && !casesForm.hasError('required')">
          <span>Please enter City</span>
        </mat-error>
      </mat-form-field>
      <mat-form-field class="example-full-width">
        <mat-label>Country</mat-label>
        <input matInput placeholder="Country" formControlName="country"
                [errorStateMatcher]="matcher">
        <mat-error *ngIf="casesForm.hasError('country') && !casesForm.hasError('required')">
          <span>Please enter Country</span>
        </mat-error>
      </mat-form-field>
      <mat-form-field class="example-full-width">
        <mat-label>Status</mat-label>
        <mat-select formControlName="status">
          <mat-option *ngFor="let sl of statusList" [value]="sl">
            {{sl}}
          </mat-option>
        </mat-select>
        <mat-error *ngIf="casesForm.hasError('status') && !casesForm.hasError('required')">
          <span>Please select Status</span>
        </mat-error>
      </mat-form-field>
      <div class="button-row">
        <button type="submit" [disabled]="!casesForm.valid" mat-flat-button color="primary"><mat-icon>save</mat-icon></button>
      </div>
    </form>
  </mat-card>
</div>
Finally, open and edit `src/app/add-cases/add-cases.component.scss` then add these CSS codes.
/* Structure */
.example-container {
  position: relative;
  padding: 5px;
}

.example-form {
  min-width: 150px;
  max-width: 500px;
  width: 100%;
}

.example-full-width {
  width: 100%;
}

.example-full-width:nth-last-child(0) {
  margin-bottom: 10px;
}

.button-row {
  margin: 10px 0;
}

.mat-flat-button {
  margin: 5px;
}
Step #8. Edit Data using Angular Material Form
We already put an edit button inside the Cases Details component for the call Edit page. Now, open and edit `src/app/edit-cases/edit-cases.component.ts`, then add these imports.
import { Router, ActivatedRoute } from '@angular/router';
import { ApiService } from '../api.service';
import { FormControl, FormGroupDirective, FormBuilder, FormGroup, NgForm, Validators } from '@angular/forms';
import { ErrorStateMatcher } from '@angular/material/core';
Inject the above modules into the constructor.
constructor(private router: Router, private route: ActivatedRoute, private api: ApiService, private formBuilder: FormBuilder) { }Declare the Form Group variable and all of the required variables for the cases-form before the constructor.
  casesForm: FormGroup;
  _id = '';
  name = '';
  gender = '';
  age: number = 0;
  address = '';
  city = '';
  country = '';
  status = '';
  statusList = ['Positive', 'Dead', 'Recovered'];
  genderList = ['Male', 'Female'];
  isLoadingResults = false;
  matcher = new MyErrorStateMatcher();
Next, add validation for all fields to the constructor body.
  constructor(private router: Router, private route: ActivatedRoute, private api: ApiService, private formBuilder: FormBuilder) {
    this.casesForm = this.formBuilder.group({
      name : [null, Validators.required],
      gender : [null, Validators.required],
      age : [null, Validators.required],
      address : [null, Validators.required],
      city : [null, Validators.required],
      country : [null, Validators.required],
      status : [null, Validators.required]
    });
  }
Create a function for getting case data that is filled to each form field.
  getCasesById(id: any) {
    this.api.getCasesById(id).subscribe((data: any) => {
      this._id = data._id;
      this.casesForm.setValue({
        name: data.name,
        gender: data.gender,
        age: data.age,
        address: data.address,
        city: data.city,
        country: data.country,
        status: data.status
      });
    });
  }
Call that function on the NgOnInit().
  ngOnInit(): void {
    this.getCasesById(this.route.snapshot.params['id']);
  }
Create a function to update the case changes.
  onFormSubmit() {
    this.isLoadingResults = true;
    this.api.updateCases(this._id, this.casesForm.value)
      .subscribe((res: any) => {
          const id = res._id;
          this.isLoadingResults = false;
          this.router.navigate(['/cases-details', id]);
        }, (err: any) => {
          console.log(err);
          this.isLoadingResults = false;
        }
      );
  }
Add a function for handling the showcases details button.
  casesDetails() {
    this.router.navigate(['/cases-details', this._id]);
  }
Create a new class before the main class `@Components`.
/** Error when invalid control is dirty, touched, or submitted. */
export class MyErrorStateMatcher implements ErrorStateMatcher {
  isErrorState(control: FormControl | null, form: FormGroupDirective | NgForm | null): boolean {
    const isSubmitted = form && form.submitted;
    return !!(control && control.invalid && (control.dirty || control.touched || isSubmitted));
  }
}
Next, open and edit `src/app/edit-cases/edit-cases.component.html` then replace all HTML tags with this.
<div class="example-container mat-elevation-z8">
  <h2>Coronavirus Edit Cases</h2>
  <div class="example-loading-shade"
        *ngIf="isLoadingResults">
    <mat-spinner *ngIf="isLoadingResults"></mat-spinner>
  </div>
  <div class="button-row">
      <a mat-flat-button color="primary" (click)="casesDetails()"><mat-icon>info</mat-icon></a>
  </div>
  <mat-card class="example-card">
    <form [formGroup]="casesForm" (ngSubmit)="onFormSubmit()">
      <mat-form-field class="example-full-width">
        <mat-label>Name</mat-label>
        <input matInput placeholder="Name" formControlName="name"
                [errorStateMatcher]="matcher">
        <mat-error *ngIf="casesForm.hasError('name') && !casesForm.hasError('required')">
          <span>Please enter Name</span>
        </mat-error>
      </mat-form-field>
      <mat-form-field class="example-full-width">
        <mat-label>Gender</mat-label>
        <mat-select formControlName="gender">
          <mat-option *ngFor="let gl of genderList" [value]="gl">
            {{gl}}
          </mat-option>
        </mat-select>
        <mat-error *ngIf="casesForm.hasError('gender') && !casesForm.hasError('required')">
          <span>Please choose Gender</span>
        </mat-error>
      </mat-form-field>
      <mat-form-field class="example-full-width">
        <mat-label>Age</mat-label>
        <input matInput type="number" placeholder="Age" formControlName="age"
                [errorStateMatcher]="matcher">
        <mat-error *ngIf="casesForm.hasError('age') && !casesForm.hasError('required')">
          <span>Please enter Age</span>
        </mat-error>
      </mat-form-field>
      <mat-form-field class="example-full-width">
        <mat-label>Address</mat-label>
        <input matInput placeholder="Address" formControlName="address"
                [errorStateMatcher]="matcher">
        <mat-error *ngIf="casesForm.hasError('address') && !casesForm.hasError('required')">
          <span>Please enter Address</span>
        </mat-error>
      </mat-form-field>
      <mat-form-field class="example-full-width">
        <mat-label>City</mat-label>
        <input matInput placeholder="City" formControlName="city"
                [errorStateMatcher]="matcher">
        <mat-error *ngIf="casesForm.hasError('city') && !casesForm.hasError('required')">
          <span>Please enter City</span>
        </mat-error>
      </mat-form-field>
      <mat-form-field class="example-full-width">
        <mat-label>Country</mat-label>
        <input matInput placeholder="Country" formControlName="country"
                [errorStateMatcher]="matcher">
        <mat-error *ngIf="casesForm.hasError('country') && !casesForm.hasError('required')">
          <span>Please enter Country</span>
        </mat-error>
      </mat-form-field>
      <mat-form-field class="example-full-width">
        <mat-label>Status</mat-label>
        <mat-select formControlName="status">
          <mat-option *ngFor="let sl of statusList" [value]="sl">
            {{sl}}
          </mat-option>
        </mat-select>
        <mat-error *ngIf="casesForm.hasError('status') && !casesForm.hasError('required')">
          <span>Please select Status</span>
        </mat-error>
      </mat-form-field>
      <div class="button-row">
        <button type="submit" [disabled]="!casesForm.valid" mat-flat-button color="primary"><mat-icon>save</mat-icon></button>
      </div>
    </form>
  </mat-card>
</div>
Finally, open and edit `src/app/edit-cases/edit-cases.component.scss` then add these lines of CSS codes.
/* Structure */
.example-container {
  position: relative;
  padding: 5px;
}

.example-form {
  min-width: 150px;
  max-width: 500px;
  width: 100%;
}

.example-full-width {
  width: 100%;
}

.example-full-width:nth-last-child(0) {
  margin-bottom: 10px;
}

.button-row {
  margin: 10px 0;
}

.mat-flat-button {
  margin: 5px;
}
Step #9. Run and Test the Angular Web App
Let's see the performance of the Angular app with the Ivy CRUD App. Now, we have to build the Angular app using this command.
ng buildNow, we have ES5 and ES2015 builds of the Angular app build for production. Next, we have to test the whole application, first, we have to run the MongoDB server and Node/Express API in the different terminals for each server.
mongod
nodemon
Then run the Angular web app build, simply type this command.
ng serveNow, you will see the simple Angular app the same as you saw in the first paragraph of this tutorial. That it's the Angular Tutorial: Easy Learning to Build CRUD Web App. You can find the full source code on our GitHub.
If you don’t want to waste your time designing your front-end or your budget to spend by hiring a web designer, then Angular Templates is the best place to go. So, speed up your front-end web development with premium Angular templates. Choose your template for your front-end project here.
That's just the basics. If you need more deep learning about Angular, you can take the following cheap course:
- Angular - The Complete Guide (2025 Edition)
- Complete Angular Course 2025 - Master Angular in only 6 days
- Angular Deep Dive - Beginner to Advanced (Angular 20)
- Modern Angular 20 with Signals - The missing guide
- The Modern Angular Bootcamp
- Angular (Full App) with Angular Material, Angularfire & NgRx
- Angular Front End Development Beginner to Master 2025
- 30 Days of Angular: Build 30 Projects with Angular
- Angular 20 Full Course - Complete Zero to Hero Angular 20
- Angular Material In Depth (Angular 20)
Thanks!
