Modern applications rarely live as a single monolithic codebase anymore. As features grow and teams scale, you need an architecture that’s modular, resilient, and easy to evolve over time. That’s where microservices come in.
In this tutorial, you’ll learn how to build a microservices architecture using NestJS, wired together with:
-
Kafka – as an event streaming platform for high-throughput, loosely coupled communication between services.
-
Redis – as a fast in-memory store for caching and lightweight coordination (rate limiting, shared state, etc.).
By the end, you’ll have a working setup where multiple NestJS services communicate over Kafka topics, share cached data via Redis, and can be developed, scaled, and deployed independently.
What We’ll Build
We’ll build a simplified but realistic microservices system, for example:
-
An API Gateway / HTTP Edge service (NestJS)
-
An Orders service (NestJS microservice)
-
A Payments service (NestJS microservice)
-
A Notifications service (NestJS microservice, e.g., email/SMS/log-based)
These services will communicate using Kafka messages instead of direct HTTP calls wherever possible. Redis will be used for:
-
Caching frequently accessed data (e.g., user or order lookups)
-
Simple coordination patterns (like idempotency or rate limiting)
The focus is not on UI, but on the backend architecture and service communication patterns.
Why NestJS for Microservices?
NestJS is a great fit for microservices because:
-
It’s opinionated and modular – perfect for splitting code into multiple services.
-
Has first-class microservice support with
@nestjs/microservices. -
Provides a consistent structure (modules, providers, controllers) across all services.
-
Makes it easy to plug in transports like Kafka, Redis, NATS, gRPC, etc.
So each microservice feels familiar, even if it has a different responsibility.
Why Kafka and Redis?
Kafka is ideal for event-driven microservices:
-
Services communicate by publishing events (e.g.,
order.created) to topics. -
Other services subscribe to those topics and react asynchronously.
-
This decouples services, so they don’t need to know each other’s URLs or be online at the same time.
Redis fits in as a sidekick:
-
Cache layer in front of databases or external APIs.
-
Shared short-lived state (tokens, locks, counters).
-
Ultra-fast reads and writes, ideal for high-traffic systems.
Together, Kafka and Redis give your NestJS microservices a scalable and responsive backend foundation.
What You’ll Learn
In this tutorial, you’ll learn how to:
-
Design a microservices architecture with NestJS.
-
Set up Kafka as the main communication backbone.
-
Use NestJS microservice transport with Kafka (producers & consumers).
-
Integrate Redis for caching and simple coordination patterns.
-
Use Docker Compose to run Kafka, Redis, and all NestJS services locally.
-
Implement event-driven flows (e.g., Order → Payment → Notification).
-
Add basic observability & error handling to your microservices.
Prerequisites
To get the most out of this tutorial, you should:
-
Be comfortable with JavaScript/TypeScript.
-
Have basic experience with Node.js and NestJS.
-
Know the basics of Docker and Docker Compose.
-
Have Node.js and npm or yarn installed.
Don’t worry if you’re new to Kafka or Redis — we’ll go through the essentials as we wire everything up.
Project Architecture & Technology Stack
Before we write any code, we need to define what services we’re building, how they communicate, and which technologies power the system. This section lays the foundation for the entire microservices architecture.
1. High-Level Architecture
Our system will follow an event-driven microservices architecture built around Kafka topics.
Here’s the simplified layout:
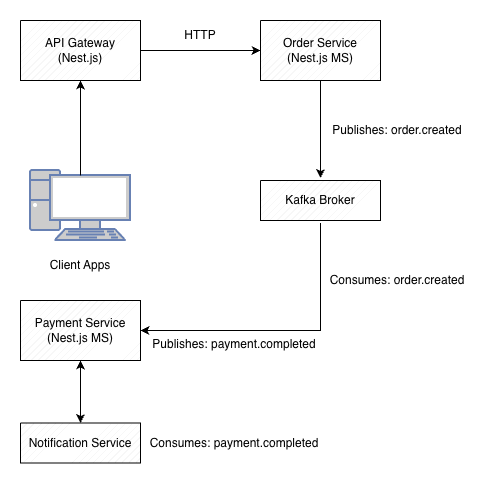
Communication Patterns
-
Client → API Gateway
REST/HTTP requests (standard NestJS controllers) -
Service → Service
Apache Kafka (event-driven messages) -
Shared caching & coordination
Redis
2. Services We Will Build
We’ll develop four independent NestJS applications, each running in its own container.
1. API Gateway (HTTP Edge Service)
Responsibilities:
-
Accept incoming HTTP requests
-
Validate data
-
Publish Kafka events (e.g.,
order.created) -
Query Redis for cached responses
2. Orders Service
Responsibilities:
-
Listen for
order.createdevents -
Process and persist orders (in-memory or simple DB)
-
Publish follow-up events like
order.verified
3. Payments Service
Responsibilities:
-
Consume events from Orders (e.g.,
order.verified) -
Perform “payment” logic (mock or real)
-
Publish
payment.completed
4. Notifications Service
Responsibilities:
-
Listen for
payment.completedevents -
Send notifications (email/SMS/log-based)
-
Demonstrate async workflows
This creates a clean event-driven pipeline:
API Gateway → Orders → Payments → Notifications
3. Why Use Kafka?
Kafka will serve as our:
-
Event bus
-
Message broker
-
Commit log for service communication
Each service becomes:
-
Publisher (sends events)
-
Subscriber (processes events)
Kafka ensures:
-
Loose coupling
-
High throughput
-
Replayability
-
Fault tolerance
Topics we’ll use:
-
order.created -
order.verified -
payment.completed
4. Why Use Redis?
Redis is used for:
1. Request caching
-
Cached order lookups
-
Cached payment results
2. Idempotency
-
Prevent duplicate request processing
(helpful when messages are retried)
3. Rate limiting (optional)
-
API Gateway can throttle abusive clients
4. Shared ephemeral state
-
Lightweight coordination between services
5. Technology Stack
NestJS
-
Version: Latest (v10+)
-
Environment: TypeScript ESM or CommonJS
-
Packages:
-
@nestjs/microservices -
@nestjs/config -
@nestjs/cache-manager -
Kafka transport
-
Redis integration
-
Kafka
-
Running via Docker (Bitnami or Confluent image)
-
Single-broker for tutorial simplicity
Redis
-
Running via Docker
-
Using the built-in NestJS cache module
Docker & Docker Compose
-
Each service runs in its own container
-
Kafka + Redis also run as containers
-
Ensures a real distributed local environment
6. Directory Structure
We’ll use a multi-folder workspace such as:
microservices-nestjs/
│
├── api-gateway/
│   └── src/...
│
├── orders-service/
│   └── src/...
│
├── payments-service/
│   └── src/...
│
├── notifications-service/
│   └── src/...
│
├── docker-compose.yaml
└── README.md
This mimics real-world microservices:
each service has its own codebase, package.json, Dockerfile, and environment config.
7. Goals for Our Architecture
By the end of this tutorial, you will have:
-
Four independently deployable NestJS microservices
-
Kafka-powered async communication
-
Redis caching and state coordination
-
Docker Compose orchestration
-
Event-driven pipelines
-
Clean separation of responsibilities
Setting Up the Project (Workspace, Services, Dependencies)
In this section, we’ll create the project structure, initialize each NestJS microservice, and install all required dependencies for Kafka and Redis. By the end, you’ll have a fully prepared workspace ready for development.
1. Create the Workspace Folder
Create a root folder to store all microservices:
mkdir microservices-nestjs
cd microservices-nestjs
Inside this folder, we’ll generate four NestJS apps:
-
api-gateway -
orders-service -
payments-service -
notifications-service
2. Install Nest CLI (if not already installed)
npm install -g @nestjs/cli
You can verify it:
nest -v
3. Generate Each Microservice
We’ll create four separate NestJS applications inside the workspace.
Each will have its own package.json, modules, controllers, etc.
API Gateway
nest new api-gatewayOrders Service
nest new orders-servicePayments Service
nest new payments-serviceNotifications Service
nest new notifications-serviceEach command will ask which package manager to use—choose your preferred one (npm/yarn/pnpm).
4. Install Required Dependencies for Kafka & Redis
4.1 Kafka Dependencies (for ALL services)
NestJS supports Kafka via the microservices package:
npm install @nestjs/microservices kafkajsKafkaJS is the Node.js Kafka client used for producers and consumers.
4.2 Redis Dependencies
We’ll use Redis for caching and lightweight coordination:
npm install cache-manager cache-manager-redis-yet redis
npm install @nestjs/cache-manager
These should be installed only in:
-
api-gateway -
optionally in other services if needed
But for simplicity, let's install Redis in all services so any can use caching if needed.
5. Configure Environment Files
Each service will need its own .env file.
Example structure:
API_GATEWAY_PORT=3000
ORDERS_SERVICE_PORT=3001
PAYMENTS_SERVICE_PORT=3002
NOTIFICATIONS_SERVICE_PORT=3003

KAFKA_BROKER=broker:9092
REDIS_HOST=redis
REDIS_PORT=6379
These will later map to environment variables inside Docker containers.
6. Create Basic Dockerfiles for Each Service
We’ll add Dockerfiles now so everything is container-ready.
Inside each service folder (api-gateway, orders-service, etc.), create a file named:
Dockerfile
FROM node:20-alpine

WORKDIR /app

COPY package*.json ./
RUN npm install

COPY . .

RUN npm run build

CMD ["node", "dist/main.js"]
Later, Docker Compose will orchestrate running all services, Kafka, and Redis.
7. Add Shared Kafka Topics (Optional)
Create a shared folder in the workspace:
shared/
└── topics.ts
Contents:
export const KAFKA_TOPICS = {
  ORDER_CREATED: 'order.created',
  ORDER_VERIFIED: 'order.verified',
  PAYMENT_COMPLETED: 'payment.completed',
};
Each service will import these constants to avoid typos and ensure consistent naming.
8. Enable Microservice Mode in Each Service
Inside each service, update main.ts to register a Kafka microservice.
Example (will refine later in the Kafka section):
import { NestFactory } from '@nestjs/core';
import { AppModule } from './app.module';
import { Transport } from '@nestjs/microservices';

async function bootstrap() {
  const app = await NestFactory.create(AppModule);

  app.connectMicroservice({
    transport: Transport.KAFKA,
    options: {
      client: {
        brokers: [process.env.KAFKA_BROKER],
      },
      consumer: {
        groupId: 'service-name-group',
      },
    },
  });

  await app.startAllMicroservices();
  await app.listen(process.env.PORT || 3000);
}

bootstrap();
We’ll fully customize this in Section 4.
9. Clean Up Default Files
Inside each service, remove unused starter files:
-
app.controller.ts -
app.service.ts
Replace them with domain-specific modules (we’ll create them later in Sections 4–7).
10. At This Point, You Have:
-
A workspace with four NestJS apps
-
Kafka + Redis client libraries installed
-
Dockerfiles created
-
Environment files prepared
-
Basic microservice bootstrapping logic
Everything is ready to begin implementing Kafka communication between services.
Creating Kafka Producers & Consumers (Event-Driven Communication)
Now that all NestJS services are set up, it’s time to connect them through Kafka.
This is the heart of the microservices architecture — services must be able to publish events and listen to events without knowing anything about each other.
NestJS provides first-class support for Kafka using the @nestjs/microservices module and KafkaJS under the hood.
In this section, you will:
-
Configure each service to connect to Kafka
-
Create producers (publish events)
-
Create consumers (subscribe to Kafka topics)
-
Build a reusable Kafka client module for clean architecture
Let’s get into it. 🚀
1. Configure Kafka in main.ts for Each Microservice
Inside every microservice (orders-service, payments-service, notifications-service), update main.ts:
import { NestFactory } from '@nestjs/core';
import { AppModule } from './app.module';
import { MicroserviceOptions, Transport } from '@nestjs/microservices';

async function bootstrap() {
  const app = await NestFactory.create(AppModule);

  app.connectMicroservice<MicroserviceOptions>({
    transport: Transport.KAFKA,
    options: {
      client: {
        brokers: [process.env.KAFKA_BROKER || 'localhost:9092'],
      },
      consumer: {
        groupId: `${process.env.SERVICE_NAME}-consumer`,
      },
    },
  });

  await app.startAllMicroservices();
  await app.listen(process.env.PORT || 3000);

  console.log(`🚀 ${process.env.SERVICE_NAME} running on port ${process.env.PORT}`);
}

bootstrap();
Each service must define a unique SERVICE_NAME in its .env file.
Example for orders-service:
SERVICE_NAME=orders-service
PORT=3001
KAFKA_BROKER=broker:9092
2. Create a Kafka Module for Reusability (Recommended)
Create a shared module inside each service:
src/kafka/kafka.module.ts
import { Module } from '@nestjs/common';
import { ClientsModule, Transport } from '@nestjs/microservices';

@Module({
    imports: [
        ClientsModule.register([
            {
                name: 'KAFKA_SERVICE',
                transport: Transport.KAFKA,
                options: {
                    client: {
                        brokers: [process.env.KAFKA_BROKER || 'localhost:9092'],
                    },
                    consumer: {
                        groupId: `${process.env.SERVICE_NAME}-producer`,
                    },
                },
            },
        ]),
    ],
    exports: ['KAFKA_SERVICE'],
})
export class KafkaModule { }
Add it to AppModule:
import { Module } from '@nestjs/common';
import { KafkaModule } from './kafka/kafka.module';

@Module({
  imports: [KafkaModule],
  controllers: [],
  providers: [],
})
export class AppModule { }
3. Creating a Kafka Producer
Each service may need to publish events such as:
-
order.created -
order.verified -
payment.completed
Create a producer service:
src/kafka/kafka-producer.service.ts
import { Inject, Injectable } from '@nestjs/common';
import { ClientKafka } from '@nestjs/microservices';

@Injectable()
export class KafkaProducerService {
    constructor(
        @Inject('KAFKA_SERVICE')
        private readonly kafkaClient: ClientKafka,
    ) { }

    async emit(topic: string, message: any) {
        return this.kafkaClient.emit(topic, message);
    }

    onModuleInit() {
        this.kafkaClient.connect();
    }
}
Register it:
src/kafka/kafka.module.ts
    providers: [KafkaProducerService],
    exports: ['KAFKA_SERVICE', KafkaProducerService],
Now any module can inject the producer:
constructor(private readonly kafkaProducer: KafkaProducerService) {}

this.kafkaProducer.emit('order.created', { id: 1, items: [...] });
4. Creating a Kafka Consumer
Consumers listen to events using NestJS message patterns.
Example inside orders-service:
src/orders/orders.controller.ts
import { Controller } from '@nestjs/common';
import { MessagePattern, Payload } from '@nestjs/microservices';
import { KAFKA_TOPICS } from '../../shared/topics';

@Controller()
export class OrdersConsumerController {
  @MessagePattern(KAFKA_TOPICS.ORDER_CREATED)
  handleOrderCreated(@Payload() message: any) {
    console.log('📥 Order Received:', message.value);
    // TODO: Verify order, save to DB, publish event
  }
}
Each service will have its own consumer controller.
5. Producers and Consumers Working Together
Example Event Flow
5.1 API Gateway publishes an event
POST /orders triggers:
this.kafkaProducer.emit('order.created', {
  orderId: '123',
  userId: '77',
  amount: 99,
});
5.2 Orders Service consumes it
@MessagePattern('order.created')
handleOrderCreated(@Payload() message) {
  console.log('Order received:', message.value);
  // Process & verify
  this.kafkaProducer.emit('order.verified', {
    orderId: message.value.orderId,
    verified: true,
  });
}
5.3 Payments Service listens for order.verified
@MessagePattern('order.verified')
handleOrderVerified(@Payload() message) {
  console.log('Processing payment for:', message.value.orderId);

  this.kafkaProducer.emit('payment.completed', {
    orderId: message.value.orderId,
    status: 'success',
  });
}
5.4 The Notifications Service listens for payment.completed
@MessagePattern('payment.completed')
handlePaymentCompleted(@Payload() message) {
  console.log('Sending notification for payment:', message.value);
}
This completes a full event-driven microservice pipeline.
6. Testing Kafka Locally (Before Docker)
If Kafka is already running:
npm run start:devYou will see logs from each service:
📥 Order Received...
💳 Payment processed...
📨 Notification sent...
This confirms the Kafka messaging layer is working.
7. What We Have So Far
At this point you have:
✔ Each service connected to Kafka
✔ A reusable KafkaModule
✔ A Kafka producer in each service
✔ A Kafka consumer in each service
✔ Full event flow: Orders → Payments → Notifications
Perfect! Now we can enhance the API Gateway and add Redis for caching.
Implementing the API Gateway (REST Endpoints + Kafka Producers + Redis Caching)
The API Gateway is the only service exposed to the outside world.
All client requests go through it, and it translates them into Kafka events consumed by the other microservices.
In this section, we will:
-
Build REST endpoints (
POST /orders) -
Publish events to Kafka (
order.created) -
Integrate Redis for caching (order lookups, response caching)
-
Add validation and DTOs
Let’s bring the gateway to life. 🚀
1. Install Dependencies (Redis + Cache)
Inside api-gateway, ensure these are installed:
npm install @nestjs/cache-manager cache-manager cache-manager-redis-yet redis2. Enable Redis Cache in app.module.ts
Create or update your AppModule:
import { Module } from '@nestjs/common';
import { KafkaModule } from './kafka/kafka.module';
import { CacheModule } from '@nestjs/cache-manager';
import { redisStore } from 'cache-manager-redis-yet';

@Module({
  imports: [
    CacheModule.registerAsync({
      useFactory: async () => ({
        store: await redisStore({
          socket: {
            host: process.env.REDIS_HOST,
            port: Number(process.env.REDIS_PORT),
          },
          ttl: 5000, // 5 seconds default
        }),
      }),
    }),
    KafkaModule,
  ],
  controllers: [],
  providers: [],
})
export class AppModule { }
This enables global Redis caching for the API Gateway.
3. Create the Orders Module
Inside api-gateway/src/orders:
orders.module.ts
orders.controller.ts
orders.service.ts
dto/create-order.dto.ts
4. Create Order DTO for Validation
dto/create-order.dto.ts:
import { IsNumber, IsString, IsArray } from 'class-validator';

export class CreateOrderDto {
    @IsString()
    userId: string;

    @IsNumber()
    amount: number;

    @IsArray()
    items: string[];
}
Install the class-validator module:
npm install class-validatorEnable validation globally in main.ts:
app.useGlobalPipes(new ValidationPipe({ whitelist: true }));5. OrdersService — Publish Events to Kafka
orders.service.ts:
import { Injectable } from '@nestjs/common';
import { KafkaProducerService } from '../kafka/kafka-producer.service';
import { KAFKA_TOPICS } from '../../../shared/topics';

@Injectable()
export class OrdersService {
    constructor(private readonly kafkaProducer: KafkaProducerService) { }

    async createOrder(orderData: any) {
        await this.kafkaProducer.emit(KAFKA_TOPICS.ORDER_CREATED, orderData);

        return {
            status: 'queued',
            message: 'Order created event published to Kafka',
            order: orderData,
        };
    }
}
6. OrdersController — REST Endpoint
orders.controller.ts:
import { Body, Controller, Post, Get, Param, Inject } from '@nestjs/common';
import { OrdersService } from './orders.service';
import type { Cache } from 'cache-manager';
import { CACHE_MANAGER } from '@nestjs/cache-manager';
import { CreateOrderDto } from './dto/create-order.dto';

@Controller('orders')
export class OrdersController {
    constructor(
        private readonly ordersService: OrdersService,
        @Inject(CACHE_MANAGER) private cacheManager: Cache,
    ) { }

    @Post()
    async createOrder(@Body() dto: CreateOrderDto) {
        return this.ordersService.createOrder(dto);
    }

    @Get(':id')
    async getOrder(@Param('id') id: string) {
        // Check Redis first
        const cached = await this.cacheManager.get(`order:${id}`);
        if (cached) {
            return {
                source: 'cache',
                data: cached,
            };
        }

        // Fallback — pretend to request from Orders Service (later we will improve this)
        const order = { id, status: 'unknown', cached: false };

        // Save to cache
        await this.cacheManager.set(`order:${id}`, order, 10_000);

        return {
            source: 'api',
            data: order,
        };
    }
}
Currently, the GET endpoint stubs an order lookup, but later we’ll integrate a proper query from the Orders Service.
7. OrdersModule
orders.module.ts:
import { Module } from '@nestjs/common';
import { OrdersController } from './orders.controller';
import { OrdersService } from './orders.service';

@Module({
  controllers: [OrdersController],
  providers: [OrdersService],
})
export class OrdersModule {}
8. Full Flow After This Section
When a client sends:
POST /orders
Content-Type: application/json

{
  "userId": "u1",
  "amount": 120,
  "items": ["product1", "product2"]
}
The API Gateway will:
-
Validate the payload
-
Publish the event
order.createdto Kafka -
Respond immediately:
{
  "status": "queued",
  "message": "Order created event published to Kafka",
  "order": { ... }
}
Next:
-
Orders Service consumes
order.created -
Payments Service consumes
order.verified -
Notifications Service consumes
payment.completed
This is a fully working event-driven architecture.
9. What You’ve Achieved
You now have:
✔ A functional API Gateway
✔ REST endpoints for creating and fetching orders
✔ Kafka event publishing
✔ Redis caching
✔ Validation & clean module structure
Nice work — this is one of the most important pieces of the system.
Implementing the Orders Service
(Processing + Verifying Orders + Publishing Events)
The Orders Service is the first microservice in the event pipeline.
It receives order.created events from Kafka, processes the order (basic validation, persistence mock), and then publishes a follow-up event: order.verified.
In this section, you’ll build:
-
A consumer who listens for
order.created -
An orders processor (mock DB + business logic)
-
A producer that emits
order.verified -
Optional Redis caching (helpful but not required)
-
Clean module structure
Let’s build the engine that drives the order pipeline. 🚀
1. Create the Orders Module Structure
Inside orders-service/src/orders:
orders.module.ts
orders.service.ts
orders.controller.ts    // Kafka consumer
order.repository.ts      // mock DB
dto/order-created.dto.ts
dto/order-verified.dto.ts
2. Create a DTO for Incoming Kafka Events
dto/order-created.dto.ts:
export class OrderCreatedDto {
  orderId: string;
  userId: string;
  amount: number;
  items: string[];
}
DTO ensures clean mapping inside the consumer.
3. Create a Fake Repository (In-Memory DB)
For tutorial simplicity, we’ll store orders in memory — in real projects, you’d use PostgreSQL, MongoDB, etc.
order.repository.ts:
import { Injectable } from '@nestjs/common';

@Injectable()
export class OrderRepository {
    private orders = new Map<string, any>();

    save(orderId: string, data: any) {
        this.orders.set(orderId, data);
    }

    find(orderId: string) {
        return this.orders.get(orderId);
    }

    update(orderId: string, updates: any) {
        const existing = this.orders.get(orderId);
        if (!existing) return;

        const updated = { ...existing, ...updates };
        this.orders.set(orderId, updated);
        return updated;
    }
}
4. Implement OrdersService Logic
This service processes orders and publishes order.verified.
orders.service.ts:
import { Injectable } from '@nestjs/common';
import { KafkaProducerService } from '../kafka/kafka-producer.service';
import { OrderRepository } from './order.repository';
import { KAFKA_TOPICS } from '../../shared/topics';

@Injectable()
export class OrdersService {
  constructor(
    private readonly repo: OrderRepository,
    private readonly kafkaProducer: KafkaProducerService,
  ) {}

  async processNewOrder(order: any) {
    console.log('📝 Processing new order:', order.orderId);

    // Save initial order
    this.repo.save(order.orderId, {
      ...order,
      status: 'received',
      verified: false,
    });

    // Simulate verifying order
    const verifiedOrder = this.repo.update(order.orderId, {
      status: 'verified',
      verified: true,
    });

    console.log('✅ Order verified, publishing event...');

    await this.kafkaProducer.emit(KAFKA_TOPICS.ORDER_VERIFIED, {
      orderId: order.orderId,
      userId: order.userId,
      amount: order.amount,
      verified: true,
    });

    return verifiedOrder;
  }
}
This service:
-
Saves incoming orders
-
Updates them after "business logic"
-
Emits
order.verified
5. Kafka Consumer for order.created
This controller listens to Kafka events.
orders.controller.ts:
import { Controller } from '@nestjs/common';
import { MessagePattern, Payload } from '@nestjs/microservices';
import { OrdersService } from './orders.service';
import { KAFKA_TOPICS } from '../../../shared/topics';

@Controller()
export class OrdersController {
    constructor(private readonly ordersService: OrdersService) { }

    @MessagePattern(KAFKA_TOPICS.ORDER_CREATED)
    async handleOrderCreated(@Payload() message: any) {
        const order = message.value;

        console.log('📥 Received order.created:', order);

        await this.ordersService.processNewOrder(order);
    }
}
This automatically consumes messages published by the API Gateway.
6. OrdersModule Registration
orders.module.ts:
import { Module } from '@nestjs/common';
import { OrdersService } from './orders.service';
import { OrdersController } from './orders.controller';
import { OrderRepository } from './order.repository';

@Module({
  providers: [OrdersService, OrderRepository],
  controllers: [OrdersController],
})
export class OrdersModule {}
And ensure it is imported in app.module.ts:
@Module({
  imports: [KafkaModule, OrdersModule],
})
export class AppModule {}
7. Event Flow After This Section
When API Gateway sends:
order.createdThe Orders Service will:
-
Receive the event
-
Save the order to the repository
-
Perform verification logic
-
Emit:
order.verifiedFor the Payments Service to consume next.
This completes the second stage of our event-driven pipeline:
API Gateway → Orders Service → Payments Service → Notifications Service8. What You’ve Achieved
You now have a fully functioning Orders Service that:
✔ Listens for Kafka events
✔ Processes and stores orders
✔ Performs basic order verification
✔ Publishes new Kafka events for downstream services
This establishes strong microservice boundaries and event-driven behavior.
Implementing the Payments Service
(Mock Payment Processing + Emitting payment.completed)
The Payments Service is the next stage in our event-driven pipeline.
It listens for order.verified events, processes the payment (mock logic), and publishes a final event: payment.completed.
This section covers:
-
Kafka consumer for
order.verified -
Mock payment processor
-
Payment repository (optional in-memory store)
-
Kafka producer for
payment.completed -
Clean module structure
Let’s continue building the service chain. 🚀
1. Create the Payments Module Structure
Inside payments-service/src/payments:
payments.module.ts
payments.controller.ts    // Kafka consumer
payments.service.ts       // business logic
payment.repository.ts     // in-memory DB (optional)
dto/order-verified.dto.ts
dto/payment-completed.dto.ts
2. DTO for Incoming Verified Orders
dto/order-verified.dto.ts:
export class OrderVerifiedDto {
  orderId: string;
  userId: string;
  amount: number;
  verified: boolean;
}
DTO keeps the code clear and typed.
3. In-Memory Payment Repository
payment.repository.ts:
import { Injectable } from '@nestjs/common';

@Injectable()
export class PaymentRepository {
  private payments = new Map<string, any>();

  save(orderId: string, data: any) {
    this.payments.set(orderId, data);
  }

  find(orderId: string) {
    return this.payments.get(orderId);
  }
}
This store processed payment results.
4. Implement Payment Processing Logic
payments.service.ts:
import { Injectable } from '@nestjs/common';
import { KafkaProducerService } from '../kafka/kafka-producer.service';
import { PaymentRepository } from './payment.repository';
import { KAFKA_TOPICS } from '../../../shared/topics';

@Injectable()
export class PaymentsService {
    constructor(
        private readonly repo: PaymentRepository,
        private readonly kafkaProducer: KafkaProducerService,
    ) { }

    async processPayment(order: any) {
        console.log('💳 Processing payment for order:', order.orderId);

        // Fake processing logic
        const success = Math.random() > 0.05; // 95% success rate

        const paymentResult = {
            orderId: order.orderId,
            userId: order.userId,
            amount: order.amount,
            status: success ? 'success' : 'failed',
            timestamp: Date.now(),
        };

        this.repo.save(order.orderId, paymentResult);

        console.log('📤 Publishing payment.completed event...');

        await this.kafkaProducer.emit(KAFKA_TOPICS.PAYMENT_COMPLETED, paymentResult);

        return paymentResult;
    }
}
What this does:
-
Simulates payment logic
-
Saves payment record
-
Emits a new Kafka event
5. Kafka Consumer for order.verified
payments.controller.ts:
import { Controller } from '@nestjs/common';
import { MessagePattern, Payload } from '@nestjs/microservices';
import { PaymentsService } from './payments.service';
import { KAFKA_TOPICS } from '../../../shared/topics';

@Controller()
export class PaymentsController {
    constructor(private readonly paymentsService: PaymentsService) { }

    @MessagePattern(KAFKA_TOPICS.ORDER_VERIFIED)
    async handleOrderVerified(@Payload() message: any) {
        const order = message.value;

        console.log('📥 Received order.verified:', order);

        await this.paymentsService.processPayment(order);
    }
}
This is the entry point for verified orders.
6. PaymentsModule Registration
payments.module.ts:
import { Module } from '@nestjs/common';
import { PaymentsService } from './payments.service';
import { PaymentsController } from './payments.controller';
import { PaymentRepository } from './payment.repository';

@Module({
  providers: [PaymentsService, PaymentRepository],
  controllers: [PaymentsController],
})
export class PaymentsModule {}
Ensure it’s imported in app.module.ts:
@Module({
  imports: [KafkaModule, PaymentsModule],
})
export class AppModule {}
7. Event Flow After This Section
The pipeline now looks like this:
order.created  →  Orders Service
order.verified →  Payments Service
payment.completed → Notifications Service (next section)
The full behavior:
-
API Gateway POST /orders
-
Sends
order.created -
Orders Service → verifies → sends
order.verified -
Payments Service processes payment → sends
payment.completed
Perfect event-driven choreography.
8. What You’ve Built
You now have a fully functioning Payments Service that:
✔ Listens for verified orders
✔ Runs mock payment logic
✔ Stores payment data
✔ Emits payment.completed events
The ecosystem is almost complete — only the Notifications Service remains.
Implementing the Notifications Service
(Consuming payment.completed + Sending Notifications)
The Notifications Service is the final microservice in our event-driven chain.
Its responsibility is simple but crucial: whenever a payment completes (successfully or not), it sends a corresponding notification.
In a real system, this might involve:
-
Email delivery (SendGrid, SES)
-
SMS (Twilio)
-
Push notifications (Firebase)
-
Webhooks or logs for analytics
For this tutorial, we’ll implement a clean and extensible notification handler that logs the notification but can easily be extended to real providers.
1. Notifications Service Module Structure
Inside notifications-service/src/notifications create:
notifications.module.ts
notifications.controller.ts   // Kafka consumer
notifications.service.ts      // business logic
notification.repository.ts    // optional storage
dto/payment-completed.dto.ts
2. DTO for Incoming Payment Events
dto/payment-completed.dto.ts:
export class PaymentCompletedDto {
  orderId: string;
  userId: string;
  amount: number;
  status: 'success' | 'failed';
  timestamp: number;
}
3. Optional Repository for Logging Notifications
This simulates a database table of sent notifications.
notification.repository.ts:
import { Injectable } from '@nestjs/common';

@Injectable()
export class NotificationRepository {
    private notifications: any[] = [];

    save(notification: any) {
        this.notifications.push(notification);
    }

    findAll() {
        return this.notifications;
    }
}
4. Implement NotificationsService Logic
notifications.service.ts:
import { Injectable } from '@nestjs/common';
import { NotificationRepository } from './notification.repository';

@Injectable()
export class NotificationsService {
  constructor(private readonly repo: NotificationRepository) {}

  async sendNotification(payment: any) {
    const message =
      payment.status === 'success'
        ? `🎉 Payment successful! Order ${payment.orderId} has been paid.`
        : `⚠️ Payment failed for order ${payment.orderId}. Please retry.`;

    const record = {
      orderId: payment.orderId,
      userId: payment.userId,
      amount: payment.amount,
      status: payment.status,
      message,
      sentAt: Date.now(),
    };

    // Save notification record (mock DB)
    this.repo.save(record);

    // Log (in a real system, you'd integrate with an email/SMS provider)
    console.log('📨 Notification sent:', message);
  }
}
This mock logic can be swapped out with Twilio, SendGrid, or any third-party provider anytime.
5. Kafka Consumer for payment.completed
notifications.controller.ts:
import { Controller } from '@nestjs/common';
import { MessagePattern, Payload } from '@nestjs/microservices';
import { NotificationsService } from './notifications.service';
import { KAFKA_TOPICS } from '../../../shared/topics';

@Controller()
export class NotificationsController {
    constructor(private readonly notificationsService: NotificationsService) { }

    @MessagePattern(KAFKA_TOPICS.PAYMENT_COMPLETED)
    async handlePaymentCompleted(@Payload() message: any) {
        const payment = message.value;

        console.log('📥 Received payment.completed:', payment);

        await this.notificationsService.sendNotification(payment);
    }
}
This completes the event-consumption chain.
6. NotificationsModule
notifications.module.ts:
import { Module } from '@nestjs/common';
import { NotificationsController } from './notifications.controller';
import { NotificationsService } from './notifications.service';
import { NotificationRepository } from './notification.repository';

@Module({
  controllers: [NotificationsController],
  providers: [NotificationsService, NotificationRepository],
})
export class NotificationsModule {}
Add it to app.module.ts:
@Module({
  imports: [KafkaModule, NotificationsModule],
})
export class AppModule {}
7. Full Event Pipeline is Now Complete 🎉
Here’s the full event flow end-to-end:
[Client] → POST /orders
        ↓
API Gateway — publishes → order.created
        ↓
Orders Service — consumes → verifies → publishes: order.verified
        ↓
Payments Service — consumes → processes payment → publishes: payment.completed
        ↓
Notifications Service — consumes → sends user notification
You now have a fully functioning microservices architecture with four fully decoupled NestJS services communicating asynchronously using Kafka, and Redis caching integrated at the API Gateway.
8. What You’ve Achieved
✔ Notifications Service implemented
✔ Consumes payment.completed events
✔ Sends notifications (mock or extensible)
✔ Final microservice in event-driven chain
✔ End-to-end workflow successfully built
Your microservice ecosystem is complete!
Dockerizing All Services + Setting Up Kafka & Redis with Docker Compose
Now that all four microservices are built (API Gateway, Orders, Payments, Notifications), it's time to run them together in a real distributed environment.
To do that, we'll:
-
Write Dockerfiles for each service (already created earlier, now we finalize them)
-
Define a docker-compose.yml to run:
-
All four NestJS services
-
Kafka (Zookeeper not needed if using Bitnami or Confluent single-node)
-
Redis
-
-
Configure environment variables per service
-
Verify inter-service communication inside Docker
This section brings everything together into a single runnable architecture. 🚀
1. Final Dockerfile for Each Service
Inside each folder (api-gateway, orders-service, payments-service, notifications-service), ensure the Dockerfile looks like this:
FROM node:20-alpine

WORKDIR /app

COPY package*.json ./
RUN npm install --production=false

COPY . .

RUN npm run build

CMD ["node", "dist/main.js"]
This ensures:
-
Dependencies installed
-
Code compiled
-
App started from
dist/
2. Environment Variables for Each Service
Create a .env inside each service:
Example for api-gateway/.env
SERVICE_NAME=api-gateway
PORT=3000
KAFKA_BROKER=kafka:9092
REDIS_HOST=redis
REDIS_PORT=6379
For orders-service/.env
SERVICE_NAME=orders-service
PORT=3001
KAFKA_BROKER=kafka:9092
For payments-service/.env
SERVICE_NAME=payments-service
PORT=3002
KAFKA_BROKER=kafka:9092
For notifications-service/.env
SERVICE_NAME=notifications-service
PORT=3003
KAFKA_BROKER=kafka:9092
3. Create docker-compose.yml in the Workspace Root
At microservices-nestjs/docker-compose.yml:
version: '3.9'

services:
  # ----------------------------------------
  # Kafka (Single Broker)
  # ----------------------------------------
  kafka:
    image: bitnami/kafka:latest
    container_name: kafka
    ports:
      - "9092:9092"
    environment:
      - KAFKA_ENABLE_KRAFT=yes
      - KAFKA_CFG_NODE_ID=1
      - KAFKA_CFG_PROCESS_ROLES=broker,controller
      - KAFKA_CFG_CONTROLLER_LISTENER_NAMES=CONTROLLER
      - KAFKA_CFG_LISTENERS=PLAINTEXT://:9092,CONTROLLER://:9093
      - KAFKA_CFG_LISTENER_SECURITY_PROTOCOL_MAP=CONTROLLER:PLAINTEXT,PLAINTEXT:PLAINTEXT
      - KAFKA_CFG_CONTROLLER_QUORUM_VOTERS=1@localhost:9093
      - KAFKA_CFG_ADVERTISED_LISTENERS=PLAINTEXT://kafka:9092
    networks:
      - microservices

  # ----------------------------------------
  # Redis
  # ----------------------------------------
  redis:
    image: redis:7-alpine
    container_name: redis
    ports:
      - "6379:6379"
    networks:
      - microservices

  # ----------------------------------------
  # API Gateway
  # ----------------------------------------
  api-gateway:
    build: ./api-gateway
    container_name: api-gateway
    env_file: ./api-gateway/.env
    depends_on:
      - kafka
      - redis
    ports:
      - "3000:3000"
    networks:
      - microservices

  # ----------------------------------------
  # Orders Service
  # ----------------------------------------
  orders-service:
    build: ./orders-service
    container_name: orders-service
    env_file: ./orders-service/.env
    depends_on:
      - kafka
    ports:
      - "3001:3001"
    networks:
      - microservices

  # ----------------------------------------
  # Payments Service
  # ----------------------------------------
  payments-service:
    build: ./payments-service
    container_name: payments-service
    env_file: ./payments-service/.env
    depends_on:
      - kafka
    ports:
      - "3002:3002"
    networks:
      - microservices

  # ----------------------------------------
  # Notifications Service
  # ----------------------------------------
  notifications-service:
    build: ./notifications-service
    container_name: notifications-service
    env_file: ./notifications-service/.env
    depends_on:
      - kafka
    ports:
      - "3003:3003"
    networks:
      - microservices

networks:
  microservices:
    driver: bridge
4. Build All Services
From workspace root:
docker-compose buildThis builds the four NestJS services + pulls Kafka & Redis images.
5. Run the Entire Microservices Ecosystem
docker-compose upYou will see output like:
api-gateway        | 🚀 API Gateway running on port 3000
orders-service     | 📥 Listening for order.created...
payments-service   | 📥 Listening for order.verified...
notifications      | 📥 Listening for payment.completed...
kafka              | Kafka Server started
At this point, your microservices architecture is officially live. 🎉
All containers can communicate over the microservices network.
6. Test the Pipeline End-to-End
Send a POST request:
curl -X POST http://localhost:3000/orders \
  -H "Content-Type: application/json" \
  -d '{
        "userId": "u123",
        "amount": 450,
        "items": ["p1", "p2"]
      }'
Watch logs from all services:
API Gateway
Published event: order.createdOrders Service
📥 Received order.created
📝 Processing...
✅ Order verified — publishing order.verified
Payments Service
📥 Received order.verified
💳 Payment processed
📤 Publishing payment.completed
Notifications Service
📥 Received payment.completed
📨 Notification sent: 🎉 Payment successful!
Perfect microservice choreography — all working inside Docker.
7. What You’ve Achieved
You now have:
✔ Four independent NestJS microservices
✔ Kafka (KRaft mode) running as a message broker
✔ Redis caching at the gateway
✔ Full Dockerized deployment
✔ Docker Compose orchestration of the entire system
Congratulations — your backend is production-grade in architecture and structure. 🚀
Observability & Monitoring
(Logs, Health Checks, Metrics for Microservices)
A microservices system is only as good as its observability.
With multiple services communicating asynchronously, you must be able to:
✔ Track what each service is doing
✔ Detect failures early
✔ Understand service-level health
✔ Monitor system-wide performance
In this section, we’ll add observability to your NestJS microservices using:
-
Structured logging
-
Health check endpoints via @nestjs/terminus
-
Prometheus-compatible metrics with prom-client
-
Optional: Docker Compose integration for Prometheus + Grafana
Let’s make your microservices production-ready. 🚀
1. Logging: Structured, Contextual, Consistent
NestJS uses a built-in logger, but we improve it with:
1.1 Contextual logs
So every log shows which service produced it.
1.2 JSON logs (ideal for ELK Stack)
ElasticSearch, Logstash, and Kibana ingest JSON easily.
1.1.1 Enable Context Logger in main.ts
Add this to each service:
import { Logger } from '@nestjs/common';

async function bootstrap() {
  const app = await NestFactory.create(AppModule, {
    bufferLogs: true,
  });

  app.useLogger(new Logger(process.env.SERVICE_NAME || 'API-Gateway'));

  ...
}
Now logs appear like:
[api-gateway] Order event published
[orders-service] Order verified
[payment-service] Payment completed
1.1.2 Add Custom Log Helpers (Optional)
Create src/logger.ts:
import { Logger } from '@nestjs/common';

export const log = (context: string, message: string, data?: any) => {
  const logger = new Logger(context);
  logger.log(JSON.stringify({ message, data }));
};
Usage:
log('OrdersService', 'Order verified', order);This standardizes logs across all services.
2. Health Checks with @nestjs/terminus
Each microservice should expose /health to let load balancers or Kubernetes know if it’s alive.
Install dependencies in each service:
npm install @nestjs/terminus @nestjs/axios rxjs2.1 Create a Health Module
Create src/health/health.module.ts:
import { Module } from '@nestjs/common';
import { TerminusModule } from '@nestjs/terminus';
import { HealthController } from './health.controller';

@Module({
  imports: [TerminusModule],
  controllers: [HealthController],
})
export class HealthModule {}
2.2 Create Health Controller
src/health/health.controller.ts:
import { Controller, Get } from '@nestjs/common';
import { HealthCheck, HealthCheckService } from '@nestjs/terminus';

@Controller('health')
export class HealthController {
  constructor(private health: HealthCheckService) {}

  @Get()
  @HealthCheck()
  check() {
    return this.health.check([]);
  }
}
Add Kafka health check inside each service:
import { KafkaHealthIndicator } from './kafka.health';

@HealthCheck()
check() {
  return this.health.check([
    async () => this.kafkaHealth.isHealthy('kafka'),
  ]);
}
Create kafka.health.ts:
import { Injectable } from '@nestjs/common';
import { HealthIndicator, HealthIndicatorResult } from '@nestjs/terminus';
import { Kafka } from 'kafkajs';

@Injectable()
export class KafkaHealthIndicator extends HealthIndicator {
  async isHealthy(key: string): Promise<HealthIndicatorResult> {
    const kafka = new Kafka({ brokers: [process.env.KAFKA_BROKER] });
    const admin = kafka.admin();

    try {
      await admin.connect();
      await admin.disconnect();
      return this.getStatus(key, true);
    } catch (e) {
      return this.getStatus(key, false);
    }
  }
}
Now you can check service health:
GET http://localhost:3001/health3. Metrics with Prometheus (prom-client)
Metrics give visibility into:
-
Request count
-
Event throughput
-
Processing duration
-
Memory usage
-
Service-specific business metrics
Install in each service:
npm install prom-client3.1 Metric Module
Create src/metrics/metrics.module.ts:
import { Module } from '@nestjs/common';
import { MetricsService } from './metrics.service';
import { MetricsController } from './metrics.controller';

@Module({
  providers: [MetricsService],
  controllers: [MetricsController],
  exports: [MetricsService],
})
export class MetricsModule {}
3.2 MetricsService
src/metrics/metrics.service.ts:
import { Injectable } from '@nestjs/common';
import { collectDefaultMetrics, Counter, Histogram } from 'prom-client';

@Injectable()
export class MetricsService {
  public orderProcessedCounter: Counter;
  public processingTimeHistogram: Histogram;

  constructor() {
    collectDefaultMetrics();

    this.orderProcessedCounter = new Counter({
      name: 'orders_processed_total',
      help: 'Total number of processed orders',
    });

    this.processingTimeHistogram = new Histogram({
      name: 'order_processing_duration_seconds',
      help: 'Order processing duration in seconds',
      buckets: [0.1, 0.5, 1, 2, 5],
    });
  }
}
Use metrics in OrdersService:
const end = this.metrics.processingTimeHistogram.startTimer();
this.metrics.orderProcessedCounter.inc();
end();
3.3 Expose Metrics Endpoint
metrics.controller.ts:
import { Controller, Get } from '@nestjs/common';
import { register } from 'prom-client';

@Controller('metrics')
export class MetricsController {
  @Get()
  async getMetrics() {
    return register.metrics();
  }
}
Prometheus will later scrape:
GET http://orders-service:3001/metrics📊 Optional: Prometheus + Grafana in Docker Compose
Add to your docker-compose.yml:
prometheus:
  image: prom/prometheus
  container_name: prometheus
  ports:
    - "9090:9090"
  volumes:
    - ./prometheus.yml:/etc/prometheus/prometheus.yml
  networks:
    - microservices

grafana:
  image: grafana/grafana
  ports:
    - "3005:3000"
  networks:
    - microservices
Example prometheus.yml:
scrape_configs:
  - job_name: 'orders-service'
    static_configs:
      - targets: ['orders-service:3001']
  - job_name: 'payments-service'
    static_configs:
      - targets: ['payments-service:3002']
Then open Grafana at:
http://localhost:30054. What You’ve Achieved
You added full observability to your microservices system:
✔ Structured logging
✔ Health checks for readiness & liveness
✔ Prometheus metrics
✔ Optional Prometheus + Grafana
✔ Better insights into event flow & performance
Your system is now debuggable, monitorable, and production-ready.
Conclusion
Building Scalable Microservices with NestJS, Kafka, and Redis
Congratulations — you’ve just built a fully operational, event-driven microservices architecture using some of the most powerful technologies in modern backend development:
-
NestJS for structured, modular services
-
Kafka for high-throughput, asynchronous communication
-
Redis for caching, speed, and coordination
-
Docker Compose for distributed local orchestration
-
Health checks, metrics, and structured logs for observability
This architecture is both scalable and resilient, making it suitable for real-world production systems where independent services must communicate reliably under high load.
🧩 What You Built
1. API Gateway
-
Validates incoming requests
-
Publishes
order.createdevents -
Implements Redis caching
-
Acts as the entry point for the system
2. Orders Service
-
Consumes
order.created -
Performs business logic and verification
-
Emits
order.verified
3. Payments Service
-
Consumes
order.verified -
Runs mock payment logic
-
Emits
payment.completed
4. Notifications Service
-
Consumes
payment.completed -
Sends user notifications
🔁 Full Event-Driven Workflow
Client → API Gateway → Kafka → Orders → Kafka → Payments → Kafka → Notifications
Each service is fully independent, deployable, and scalable on its own — the hallmark of a robust microservices system.
🚀 What You Can Add Next (Real-World Enhancements)
If you’d like to take this architecture to an even higher level, consider:
1. Add Databases per Service
-
PostgreSQL for Orders
-
MongoDB for Notifications
-
Ensures service autonomy
2. Implement Saga or Orchestration Patterns
-
Handle distributed transactions
-
Use compensating actions
3. Add Security
-
JWT authentication at the gateway
-
API rate limiting with Redis
-
Kafka ACLs
4. Move to Production Infrastructure
-
Deploy using Kubernetes
-
Use Helm charts
-
Add Kafka clusters, Redis clusters
5. Replace Mock Payment Logic With a Real Provider
-
Stripe, PayPal, Midtrans, Xendit, etc.
6. Introduce Tracing
-
Jaeger, Zipkin, OpenTelemetry
-
View full end-to-end trace across services
🎯 Final Thoughts
Microservices aren’t just about breaking an app into smaller parts — they’re about designing a communication-driven architecture that scales, evolves, and fails gracefully.
In this tutorial, you’ve learned how to:
-
Design a microservices ecosystem
-
Coordinate services using Kafka
-
Cache expensive lookups using Redis
-
Dockerize and orchestrate everything
-
Add logs, health checks, and metrics
You now have a real, working foundation that mirrors how large-scale systems are built in modern engineering teams.
Your next project can extend this into a high-performance production backend — and NestJS, Kafka, Redis, and Docker Compose give you everything you need to get there.
You can find the full source code on our GitHub.
That's just the basics. If you need more deep learning about Nest.js, you can take the following cheap course:
- NestJS: The Complete Developer's Guide
- NestJS Masterclass - NodeJS Framework Backend Development
- NestJS Mastery: Build & Deploy a Production-Ready API
- NestJS Zero to Hero - Modern TypeScript Back-end Development
- NestJS Microservices: Build & Deploy a Scaleable Backend
- NestJS: Build a Real-Time Social Media API (/w WebSockets)
- NestJS Unleashed: Develop Robust and Maintainable Backends
- The Nest JS Bootcamp - Complete Developer Guide
Thanks!