
In modern web development, building type-safe APIs has become a critical part of ensuring reliability, maintainability, and developer productivity. With Next.js 14 introducing powerful new features like App Router, Server Actions, and React Server Components, the framework is more capable than ever of handling both frontend and backend logic in a unified environment. But when it comes to ensuring full type safety between client and server — without repetitive schema definitions or manual API typing — that’s where tRPC truly shines.
tRPC (TypeScript Remote Procedure Call) allows you to create end-to-end type-safe APIs in TypeScript without needing REST or GraphQL. It enables direct function calls between client and server with automatic type inference, meaning if you change a type on the backend, the frontend immediately knows about it — no extra code or validation layers required.
In this tutorial, we’ll walk through how to set up and use tRPC with Next.js 14, covering everything from project initialization to creating routers, procedures, and calling them from your frontend components. By the end, you’ll have a fully working type-safe API layer integrated seamlessly with your Next.js app.
Whether you’re a seasoned Next.js developer or just exploring modern TypeScript-based backend patterns, this guide will show you how to eliminate API mismatches, reduce boilerplate, and build scalable, type-safe applications effortlessly.
Prerequisites and Setup
Before diving into building with tRPC and Next.js 14, let’s make sure your development environment is ready. This setup ensures smooth development with full TypeScript support and the latest Next.js features.
Prerequisites
To follow along, you should have a basic understanding of:
-
Next.js and React fundamentals
-
TypeScript syntax and types
-
Node.js and npm (or yarn/pnpm)
You’ll also need the following installed on your system:
-
Node.js version 18.17+ or 20+
-
npm, yarn, or pnpm package manager
-
A modern code editor (VS Code is recommended)
You can check your Node.js version by running:
node -vIf you need to install or update Node.js, visit nodejs.org.
Creating a New Next.js 14 Project
Let’s start by creating a new Next.js 14 application using the official Next.js CLI:
npx create-next-app@latest nextjs-trpc-appWhen prompted:
-
✅ TypeScript: Yes
-
✅ ESLint: Yes
-
✅ App Router: Yes (important for Next.js 14)
-
✅ Tailwind CSS: Optional, but we’ll include it later for UI styling
Once the setup finishes, navigate into the project directory:
cd nextjs-trpc-appRun the development server to confirm everything works:
npm run devThen open your browser and visit http://localhost:3000 — you should see the default Next.js welcome page.
Installing tRPC and Dependencies
Now that we have a fresh Next.js project, let’s install tRPC and its core dependencies.
Run the following command:
npm install @trpc/server @trpc/client @trpc/react-query @tanstack/react-query zodHere’s what each package does:
-
@trpc/server – Core tRPC server library for defining routers and procedures
-
@trpc/client – Client-side tRPC utilities for calling backend procedures
-
@trpc/react-query – Integration layer between tRPC and React Query for fetching and caching
-
@tanstack/react-query – Data fetching and caching library
-
zod – Schema validation library often used with tRPC for input validation and type inference
Project Structure Overview
To keep things organized, we’ll follow this basic structure for our app:
nextjs-trpc-app/
├── src/
│   ├── app/
│   │   └── page.tsx
│   ├── server/
│   │   ├── routers/
│   │   │   └── appRouter.ts
│   │   └── trpc.ts
│   └── utils/
│       └── trpc.ts
├── package.json
├── tsconfig.json
└── next.config.js
This structure separates the server logic (routers, procedures) from the client logic, allowing clean organization and scalability.
Setting Up tRPC on the Server
Now that your project is initialized and dependencies are installed, it’s time to set up tRPC on the server side. This includes creating a tRPC context, initializing the server, and defining your first router and procedure.
1. Create the tRPC Context
The context in tRPC provides shared data to all procedures, such as database connections, authentication info, or request metadata.
Create a new file at:
src/server/trpc.tsAdd the following code:
import { initTRPC } from '@trpc/server';

// Create tRPC instance
const t = initTRPC.create();

// Export reusable helpers
export const router = t.router;
export const publicProcedure = t.procedure;
This file sets up a base tRPC instance that we’ll reuse for defining routers and procedures throughout the app.
2. Define a Router and Procedure
Routers group related API procedures together. Let’s create a simple example router that provides a “hello” procedure.
Create a new file at:
src/server/routers/appRouter.tsAdd the following code:
import { router, publicProcedure } from '../trpc';
import { z } from 'zod';

export const appRouter = router({
  hello: publicProcedure
    .input(
      z.object({
        name: z.string().optional(),
      })
    )
    .query(({ input }) => {
      return {
        message: `Hello, ${input?.name ?? 'World'}!`,
      };
    }),
});

// Export type definitions
export type AppRouter = typeof appRouter;
Here’s what’s happening:
-
The
helloprocedure is a simple query endpoint that optionally takes anameas input. -
The Zod schema ensures input validation and provides type inference for both the client and server.
-
The
AppRoutertype is exported so the client can infer types automatically later.
3. Create the API Handler for Next.js 14
In Next.js 14, we’ll expose tRPC through the new App Router API routes. Create a new file at:
src/app/api/trpc/[trpc]/route.tsAdd this code:
import { appRouter } from '@/src/server/routers/appRouter';
import { fetchRequestHandler } from '@trpc/server/adapters/fetch';

const handler = (request: Request) =>
    fetchRequestHandler({
        endpoint: '/api/trpc',
        req: request,
        router: appRouter,
        createContext: () => ({}), // optional, no context yet
    });

export { handler as GET, handler as POST };
Explanation:
-
fetchRequestHandleris the new adapter that works with the App Router’s server functions. -
We export both GET and POST handlers to handle client requests.
-
For now, the context is empty, but we can later extend it with authentication or database access.
4. Verify the API
You can now start your development server:
npm run devThen open your browser and visit:
👉 http://localhost:3000/api/trpc/hello?input={"name":"Djamware"}
You should get a JSON response like this:
{"result":{"data":{"message":"Hello, Djamware!"}}}If you see this, your tRPC backend is working correctly! 🎉
Connecting tRPC to the Client
Now that your tRPC server is fully configured, it’s time to integrate it with your Next.js 14 frontend. We’ll use the @trpc/react-query package to create a type-safe client and hook it into React components seamlessly.
1. Create a tRPC Client Utility
We’ll set up a reusable tRPC client instance that can be used across your application.
Create a new file:
src/utils/trpc.tsAdd the following code:
import { createTRPCReact } from '@trpc/react-query';
import { AppRouter } from '../server/routers/appRouter';

export const trpc = createTRPCReact<AppRouter>();
This file exports a typed tRPC instance linked to your AppRouter type from the server.
Now your frontend will automatically infer all available procedures and their input/output types.
2. Set Up tRPC Provider in Next.js
tRPC relies on React Query for managing server state, so we’ll create a provider that wraps your app and connects everything.
Create a new file:
src/utils/trpcProvider.tsxAdd this code:
"use client";

import React from "react";
import { QueryClient, QueryClientProvider } from "@tanstack/react-query";
import { httpBatchLink } from "@trpc/client";
import { trpc } from "./trpc";

export const TrpcProvider = ({ children }: { children: React.ReactNode }) => {
  const [queryClient] = React.useState(() => new QueryClient());
  const [trpcClient] = React.useState(() =>
    trpc.createClient({
      links: [
        httpBatchLink({
          url: "/api/trpc"
        })
      ]
    })
  );

  return (
    <trpc.Provider client={trpcClient} queryClient={queryClient}>
      <QueryClientProvider client={queryClient}>{children}</QueryClientProvider>
    </trpc.Provider>
  );
};
Explanation:
-
We use
httpBatchLinkto efficiently send multiple tRPC calls in a single HTTP request. -
TrpcProviderwraps your app and gives all components access to the tRPC client and React Query instance. -
The
"use client"directive ensures this component runs on the client side.
3. Wrap Your Application with the Provider
Open the main layout file:
src/app/layout.tsxUpdate it as follows:
import { TrpcProvider } from "../utils/trpcProvider";
import "./globals.css";

export default function RootLayout({
  children
}: {
  children: React.ReactNode;
}) {
  return (
    <html lang="en">
      <body>
        <TrpcProvider>{children}</TrpcProvider>
      </body>
    </html>
  );
}
Now, your entire app is connected to the tRPC client.
4. Calling a tRPC Procedure from a Component
Let’s test our setup by calling the hello procedure from the frontend.
Open your main page file:
src/app/page.tsxReplace the contents with:
"use client";

import { trpc } from "../utils/trpc";

export default function HomePage() {
  const { data, isLoading } = trpc.hello.useQuery({ name: "Djamware" });

  if (isLoading) return <p>Loading...</p>;

  return (
    <main className="flex min-h-screen flex-col items-center justify-center p-8">
      <h1 className="text-3xl font-bold mb-4">Using tRPC with Next.js 14</h1>
      <p className="text-lg">{data?.message}</p>
    </main>
  );
}
Now run your dev server again:
Visit http://localhost:3000 — you should see:
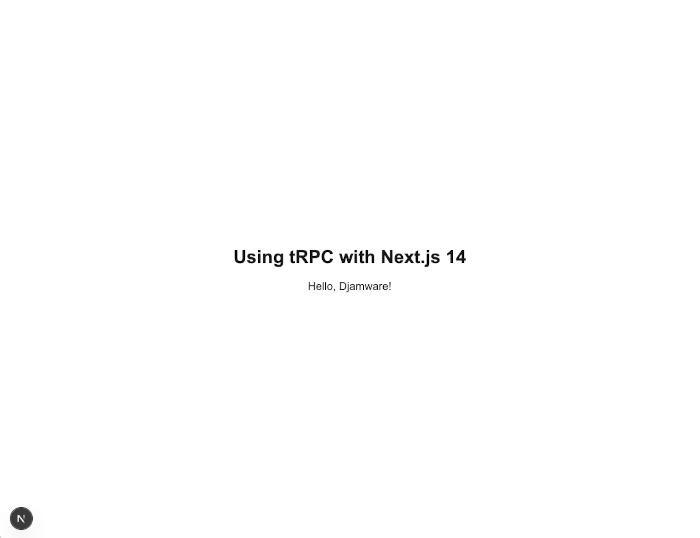
This confirms your frontend and backend are communicating end-to-end with full type safety ✅
5. Type-Safety in Action
Here’s the magic of tRPC:
-
Change the
helloprocedure input type inappRouter.ts(for example, renamenametousername). -
The frontend will instantly show a TypeScript error where you’re still passing
name.
That’s real-time type synchronization — no schemas, no REST endpoints, no GraphQL boilerplate.
Adding Input Validation and Mutations
In tRPC, queries are for fetching data, and mutations are for changing it — similar to React Query’s pattern. Thanks to Zod, every mutation and query can have strong runtime validation and compile-time type inference.
In this section, we’ll add:
-
A Zod schema for structured validation.
-
A mutation procedure to simulate saving data.
-
A frontend form to trigger the mutation.
1. Add a Mutation Procedure
Let’s extend our existing router with a simple mutation that takes user input and returns a confirmation message.
Open your router file:
src/server/routers/appRouter.tsModify it like this:
import { router, publicProcedure } from '../trpc';
import { z } from 'zod';

export const appRouter = router({
    // Existing hello query
    hello: publicProcedure
        .input(z.object({ name: z.string().optional() }))
        .query(({ input }) => {
            return { message: `Hello, ${input?.name ?? 'World'}!` };
        }),

    // New mutation
    saveMessage: publicProcedure
        .input(
            z.object({
                username: z.string().min(3, 'Name must be at least 3 characters'),
                message: z.string().min(5, 'Message must be at least 5 characters'),
            })
        )
        .mutation(({ input }) => {
            // Simulate saving to a database
            console.log('Saved message:', input);
            return {
                success: true,
                response: `Message from ${input.username} saved successfully!`,
            };
        }),
});

export type AppRouter = typeof appRouter;
Here’s what’s happening:
-
Zod enforces that both
usernameandmessagemeet specific length requirements. -
.mutation()defines a function that performs a data modification (like a POST request). -
We simulate saving data by logging it and returning a success message.
2. Create a Form Component for Mutations
Now, let’s add a small form to the frontend that allows users to submit data to the saveMessage mutation.
Open or create this file:
src/app/page.tsxReplace the contents with:
"use client";

import { useState } from "react";
import { trpc } from "../utils/trpc";

export default function HomePage() {
  const hello = trpc.hello.useQuery({ name: "Djamware" });
  const saveMessage = trpc.saveMessage.useMutation();

  const [username, setUsername] = useState("");
  const [message, setMessage] = useState("");
  const [response, setResponse] = useState("");

  const handleSubmit = async (e: React.FormEvent) => {
    e.preventDefault();
    try {
      const result = await saveMessage.mutateAsync({ username, message });
      setResponse(result.response);
    } catch (error: any) {
      setResponse(error.message || "An error occurred.");
    }
  };

  return (
    <main className="flex min-h-screen flex-col items-center justify-center p-8">
      <h1 className="text-3xl font-bold mb-4">Using tRPC with Next.js 14</h1>
      <p className="text-lg mb-6">{hello.data?.message}</p>

      <form
        onSubmit={handleSubmit}
        className="flex flex-col gap-4 w-full max-w-md border rounded-2xl p-6 shadow"
      >
        <input
          type="text"
          placeholder="Your Name"
          value={username}
          onChange={(e) => setUsername(e.target.value)}
          className="border rounded-lg p-2 w-full"
        />
        <textarea
          placeholder="Your Message"
          value={message}
          onChange={(e) => setMessage(e.target.value)}
          className="border rounded-lg p-2 w-full h-24"
        />
        <button
          type="submit"
          disabled={saveMessage.isPending}
          className="bg-blue-600 text-white py-2 px-4 rounded-lg hover:bg-blue-700"
        >
          {saveMessage.isPending ? "Saving..." : "Save Message"}
        </button>
      </form>

      {response && (
        <p className="mt-4 text-green-600 font-medium">{response}</p>
      )}
    </main>
  );
}
Explanation:
-
trpc.saveMessage.useMutation()gives access to a type-safe mutation function. -
We use
mutateAsyncto call it and handle the result or error. -
If the validation fails (e.g., too short input), tRPC automatically throws a Zod validation error, visible in your browser console or network tab.
3. Test the Mutation
Now start your dev server:
npm run devVisit http://localhost:3000, enter a short name and message, and hit Save Message.
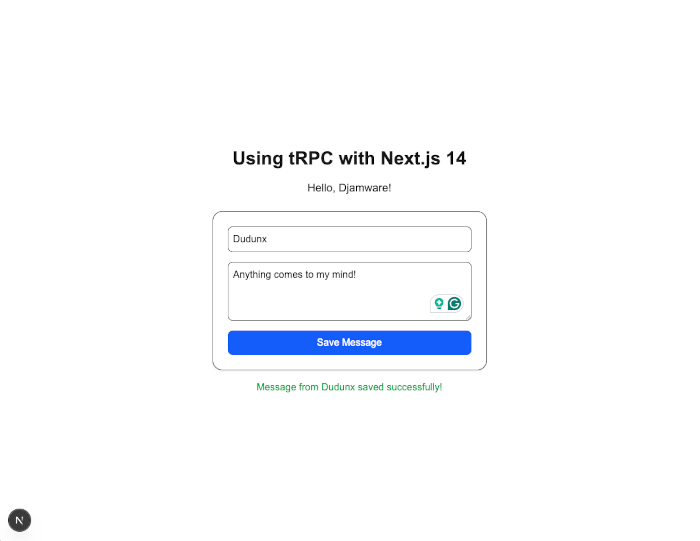
You’ll see:
-
A success message is displayed below the form.
-
The server logs your input in the terminal.
-
If validation fails, you’ll see descriptive errors in the console — straight from Zod validation.
4. Why This Matters
With this setup:
-
✅ Full type safety from server to client — change types once, and both ends stay synced.
-
✅ Automatic input validation — using Zod ensures runtime safety.
-
✅ No REST endpoints or GraphQL schemas — just pure TypeScript functions.
This dramatically reduces boilerplate and speeds up development, all while maintaining rock-solid reliability.
Advanced Features: Middleware and Protected Routes
Now that we have working queries and mutations, it’s time to introduce authorization and middleware into our tRPC API.
tRPC makes it simple to protect routes and share logic across multiple procedures without extra frameworks or complex configuration.
1. Extending the tRPC Context
First, we’ll extend our tRPC context to include user authentication data. In a real-world app, this would come from a session, token, or database lookup.
Open your existing file:
src/server/trpc.tsReplace it with:
import { initTRPC, TRPCError } from '@trpc/server';

type CreateContextOptions = {
    user?: {
        id: string;
        name: string;
        role: 'USER' | 'ADMIN';
    };
};

// Simple context simulation (replace with real auth in production)
export const createContext = async (): Promise<CreateContextOptions> => {
    // For demonstration, we'll just return a fake logged-in user
    return {
        user: {
            id: '1',
            name: 'Djamware',
            role: 'ADMIN',
        },
    };
};

const t = initTRPC.context<typeof createContext>().create();

// Export reusable helpers
export const router = t.router;
export const publicProcedure = t.procedure;

// Middleware for protected routes
const isAuthed = t.middleware(({ ctx, next }) => {
    if (!ctx.user) {
        throw new TRPCError({ code: 'UNAUTHORIZED', message: 'User not authenticated' });
    }
    return next({
        ctx: {
            user: ctx.user,
        },
    });
});

export const protectedProcedure = t.procedure.use(isAuthed);
Explanation:
-
We define a context that includes
userdata. -
We create a middleware (
isAuthed) that checks if a user is present in the context. -
protectedProcedurewraps any route that should only be accessible to authenticated users.
2. Update the API Handler
Next, ensure the tRPC API handler uses this new context function.
Open your API route:
src/app/api/trpc/[trpc]/route.tsUpdate it like this:
import { appRouter } from '@/src/server/routers/appRouter';
import { createContext } from '@/src/server/trpc';
import { fetchRequestHandler } from '@trpc/server/adapters/fetch';

const handler = (request: Request) =>
    fetchRequestHandler({
        endpoint: '/api/trpc',
        req: request,
        router: appRouter,
        createContext,
    });

export { handler as GET, handler as POST };
Now every incoming request gets a context with user info (even if it’s mocked for now).
3. Create a Protected Route
Let’s add a new protected procedure that only authenticated users can access.
Open:
src/server/routers/appRouter.tsAdd this new procedure:
import { router, publicProcedure, protectedProcedure } from '../trpc';
import { z } from 'zod';

export const appRouter = router({
    // Existing hello query
    hello: publicProcedure
        .input(z.object({ name: z.string().optional() }))
        .query(({ input }) => {
            return { message: `Hello, ${input?.name ?? 'World'}!` };
        }),

    // New mutation
    saveMessage: publicProcedure
        .input(
            z.object({
                username: z.string().min(3, 'Name must be at least 3 characters'),
                message: z.string().min(5, 'Message must be at least 5 characters'),
            })
        )
        .mutation(({ input }) => {
            // Simulate saving to a database
            console.log('Saved message:', input);
            return {
                success: true,
                response: `Message from ${input.username} saved successfully!`,
            };
        }),

    // New protected route
    secretData: protectedProcedure.query(({ ctx }) => {
        return {
            message: `Welcome ${ctx.user?.name}, you have ${ctx.user?.role} access!`,
        };
    }),
});

export type AppRouter = typeof appRouter;
This route:
-
Uses
protectedProcedureto ensure only authenticated users can access it. -
Returns a message with the user’s name and role from the context.
4. Access the Protected Route from the Frontend
Now let’s display this protected data in the UI.
Open:
src/app/page.tsxAdd the following code below your existing form logic:
"use client";

import { useState } from "react";
import { trpc } from "../utils/trpc";

export default function HomePage() {
  const hello = trpc.hello.useQuery({ name: "Djamware" });
  const saveMessage = trpc.saveMessage.useMutation();
  const secretData = trpc.secretData.useQuery();

  const [username, setUsername] = useState("");
  const [message, setMessage] = useState("");
  const [response, setResponse] = useState("");

  const handleSubmit = async (e: React.FormEvent) => {
    e.preventDefault();
    try {
      const result = await saveMessage.mutateAsync({ username, message });
      setResponse(result.response);
    } catch (error: any) {
      setResponse(error.message || "An error occurred.");
    }
  };

  return (
    <main className="flex min-h-screen flex-col items-center justify-center p-8">
      <h1 className="text-3xl font-bold mb-4">Using tRPC with Next.js 14</h1>
      <p className="text-lg mb-6">{hello.data?.message}</p>

      <form
        onSubmit={handleSubmit}
        className="flex flex-col gap-4 w-full max-w-md border rounded-2xl p-6 shadow"
      >
        <input
          type="text"
          placeholder="Your Name"
          value={username}
          onChange={(e) => setUsername(e.target.value)}
          className="border rounded-lg p-2 w-full"
        />
        <textarea
          placeholder="Your Message"
          value={message}
          onChange={(e) => setMessage(e.target.value)}
          className="border rounded-lg p-2 w-full h-24"
        />
        <button
          type="submit"
          disabled={saveMessage.isPending}
          className="bg-blue-600 text-white py-2 px-4 rounded-lg hover:bg-blue-700"
        >
          {saveMessage.isPending ? "Saving..." : "Save Message"}
        </button>
      </form>

      {response && (
        <p className="mt-4 text-green-600 font-medium">{response}</p>
      )}

      <div className="mt-8 p-4 bg-gray-100 rounded-xl shadow-md w-full max-w-md text-center">
        <h2 className="text-xl font-semibold mb-2">Protected Data</h2>
        {secretData.data ? (
          <p className="text-gray-700">{secretData.data.message}</p>
        ) : (
          <p className="text-red-500">
            You are not authorized to view this data.
          </p>
        )}
      </div>
    </main>
  );
}
When you reload the page, you’ll see:
Welcome Djamware, you have ADMIN access!
That means your middleware, context, and protected routes are working perfectly.
5. Summary
You’ve now implemented:
✅ Middleware-based authentication with type safety
✅ Protected routes that only allow authorized access
✅ Reusable context for all server-side logic
This foundation is scalable for:
-
Real user sessions via NextAuth.js or JWT tokens
-
Role-based access control (RBAC)
-
Complex validation flows and shared utilities
Testing, Deployment, and Final Thoughts
You’ve successfully built a fully type-safe API using tRPC and Next.js 14 — complete with queries, mutations, validation, and protected routes. In this final section, we’ll explore how to test, deploy, and extend your project for real-world applications.
1. Testing Your tRPC Procedures
tRPC procedures are just TypeScript functions, so they’re easy to test directly — no HTTP layer required. You can use your favorite testing framework, like Jest or Vitest.
Here’s a simple example using Vitest.
Install Vitest:
npm install -D vitestCreate a test file:
src/server/routers/appRouter.test.tsAdd the following test:
import { describe, it, expect } from 'vitest';
import { appRouter } from './appRouter';

describe('tRPC appRouter', () => {
    const caller = appRouter.createCaller({ user: { id: '1', name: 'Test', role: 'ADMIN' } });

    it('should return hello message', async () => {
        const result = await caller.hello({ name: 'Djamware' });
        expect(result.message).toBe('Hello, Djamware!');
    });

    it('should save message successfully', async () => {
        const result = await caller.saveMessage({
            username: 'John',
            message: 'Hello World!',
        });
        expect(result.success).toBe(true);
    });

    it('should return protected data for authorized user', async () => {
        const result = await caller.secretData();
        expect(result.message).toContain('ADMIN');
    });
});
Then run:
npx vitest✅ All tests should pass, confirming that your tRPC API works independently from Next.js — fast, isolated, and type-safe.
2. Preparing for Deployment
Next.js 14 and tRPC work seamlessly with Vercel, but you can also deploy to Node.js, Docker, or Edge Functions.
For Vercel:
Simply push your code to a GitHub repository and deploy via Vercel.
Vercel automatically detects:
-
The Next.js framework
-
API routes in
/app/api/trpc -
Serverless runtime
Your tRPC handlers will work out of the box as Edge API Routes.
For Custom Node.js Hosting:
You can run your app with:
npm run build
npm start
Next.js will compile both frontend and backend code into a single optimized build.
3. Environment Variables
When adding authentication or database connections (like Prisma, Supabase, or MongoDB), create a .env file in your root directory:
DATABASE_URL="your-database-url"
JWT_SECRET="super-secret-key"
Load it safely via:
process.env.DATABASE_URLNever commit .env files to Git.
4. Scaling Your tRPC Application
As your project grows, here are some best practices:
🧩 Modular Routers:
Split your procedures into multiple files (e.g., userRouter, postRouter, authRouter) and merge them with mergeRouters().
🛡️ Role-Based Authorization:
Extend your middleware to restrict routes based on ctx.user.role for granular permissions.
🧠 Data Persistence:
Integrate with Prisma ORM or Drizzle to store and query data with full type inference.
🌍 API Versioning:
Use router namespaces (v1Router, v2Router) for incremental migrations without breaking clients.
5. Conclusion
You’ve built a modern, type-safe full-stack application with tRPC and Next.js 14 — featuring:
✅ End-to-end type safety (no manual API typing)
✅ Zod-powered runtime validation
✅ Seamless client-server communication
✅ Middleware and protected routes
✅ Easy testing and deployment
This architecture gives you the best of both worlds — the flexibility of function-based APIs and the reliability of static typing — all inside your Next.js app.
tRPC eliminates the need for REST or GraphQL schemas, drastically reducing boilerplate while maintaining strict type integrity. Combined with the App Router and React Server Components from Next.js 14, it’s an incredibly efficient setup for modern full-stack TypeScript applications.
You can find the full source code on our GitHub.
That's just the basics. If you need more deep learning about Next.js, you can take the following cheap course:
- Next.js 15 & React - The Complete Guide
- The Ultimate React Course 2025: React, Next.js, Redux & More
- React - The Complete Guide 2025 (incl. Next.js, Redux)
- Next.js Ecommerce 2025 - Shopping Platform From Scratch
- Next JS: The Complete Developer's Guide
- Next.js & Supabase Mastery: Build 2 Full-Stack Apps
- Complete React, Next.js & TypeScript Projects Course 2025
- Next.js 15 Full Stack Complete Learning Management System
- Next.js 15 & Firebase
- Master Next.js 15 - Build and Deploy an E-Commerce Project
Thanks!