
Rust has rapidly become a popular choice for building fast, safe, and reliable backend services, especially in performance-critical environments. Its strong type system and memory safety guarantees make it an excellent fit for modern microservices, where efficiency and correctness are key.
In this tutorial, we’ll guide you through building a microservice in Rust using Axum, a web framework built on top of Tokio and Tower, designed for ergonomic and high-speed performance. To interact with the database, we’ll use SQLx, a fully asynchronous, compile-time verified SQL crate that supports multiple backends.
We’ll cover everything you need to get started:
-
Setting up a new Axum project
-
Connecting to a PostgreSQL database using SQLx
-
Defining models and performing CRUD operations
-
Structuring the microservice for scalability
-
Running and testing the microservice
Whether you're just exploring Rust for backend development or already building a Rust-based architecture, this guide will provide a practical foundation for creating robust microservices with Axum and SQLx.
Prerequisites
Before we begin, make sure you have the following installed:
-
Rust (stable) – Install via rustup
-
PostgreSQL – A running PostgreSQL instance (local or remote)
-
Cargo – Comes with Rust via rustup
-
SQLx CLI (optional) – For running migrations (install via
cargo install sqlx-cli --no-default-features --features postgres)
Also, make sure psql is available if you want to manually inspect or manage the database from the command line.
Let’s dive in and build a fast, secure, and production-ready microservice with Rust!
1. Project Setup
Let’s start by creating a new Rust project:
mkdir rust_axum_sqlx_microservice
cd rust_axum_sqlx_microservice
cargo new user_service
cd user_service
Next, open the Cargo.toml file and add the necessary dependencies:
[dependencies]
axum = "0.8.4"
tokio = { version = "1", features = ["full"] }
serde = { version = "1.0", features = ["derive"] }
serde_json = "1.0"
sqlx = { version = "0.8.6", features = [
    "postgres",
    "runtime-tokio-rustls",
    "macros",
    "uuid",                 # 👈 Add this line
] }
dotenvy = "0.15"
tower = "0.5.2"
thiserror = "2.0.12"
uuid = { version = "1", features = ["v4", "serde"] }
hyper = { version = "0.14.27", features = ["full"] }
Install the dependencies:
cargo build
2. Setting Up the Database
Create a new PostgreSQL database, for example:
psql postgres -U djamware
CREATE DATABASE rust_microservice;
\q
Then, create a .env file in the project root to store your database URL:
DATABASE_URL=postgres://djamware:dj%40mw%40r3@localhost/rust_microserviceWe’ll load this .env file using dotenvy.
3. Define the Database Model and Run Migrations
In this example, we’ll build a simple microservice that manages users, with fields for id, name, and email.
3.1. Create the Users Table
You can manually create the table using psql or automate it with SQLx migrations.
Here’s the SQL schema:
CREATE TABLE users (
    id UUID PRIMARY KEY DEFAULT gen_random_uuid(),
    name TEXT NOT NULL,
    email TEXT NOT NULL UNIQUE
);
If you installed sqlx-cli, you can manage migrations like this:
sqlx migrate add create_users_tableThen, in the newly created migration file under migrations/, paste the SQL above.
Before running migrations, make sure the DATABASE_URL environment variable is available:
source .env
sqlx migrate run
💡 If gen_random_uuid() is undefined, run:
CREATE EXTENSION IF NOT EXISTS "pgcrypto";
3.2. Define the User Model in Rust
Create a new file src/models.rs:
use serde::{ Deserialize, Serialize };
use sqlx::FromRow;
use uuid::Uuid;

#[derive(Serialize, Deserialize, FromRow, Debug, Clone)]
pub struct User {
    pub id: Uuid,
    pub name: String,
    pub email: String,
}
Add the module to main.rs (or lib.rs):
mod models;
use models::User;
3.3. Connect to the Database
Create a new file src/db.rs:
use sqlx::postgres::PgPoolOptions;
use sqlx::PgPool;
use std::env;

pub async fn connect_db() -> PgPool {
    let database_url = env::var("DATABASE_URL").expect("DATABASE_URL must be set");
    PgPoolOptions::new()
        .max_connections(5)
        .connect(&database_url).await
        .expect("Failed to connect to database")
}
Don’t forget to load the .env file in main.rs:
use dotenvy::dotenv;
use std::env;

mod db;
mod models;

#[tokio::main]
async fn main() {
    dotenv().ok();

    let pool = db::connect_db().await;
    println!("Connected to database");

    // We'll add Axum router and routes here next
}
4. Implementing CRUD Endpoints with Axum
We’ll now add the following routes to manage users:
-
GET /users– List all users -
GET /users/:id– Get user by ID -
POST /users– Create a new user -
PUT /users/:id– Update user by ID -
DELETE /users/:id– Delete user by ID
4.1. Define Handler Functions
Create a new file: src/handlers.rs
use axum::{ extract::{ Path, State }, http::StatusCode, response::IntoResponse, Json };
use sqlx::PgPool;
use uuid::Uuid;

use crate::models::User;

#[derive(serde::Deserialize)]
pub struct CreateUser {
    pub name: String,
    pub email: String,
}

pub async fn get_users(State(pool): State<PgPool>) -> impl IntoResponse {
    match sqlx::query_as::<_, User>("SELECT * FROM users").fetch_all(&pool).await {
        Ok(users) => (StatusCode::OK, Json(users)).into_response(),
        Err(_) => StatusCode::INTERNAL_SERVER_ERROR.into_response(),
    }
}

pub async fn get_user(Path(id): Path<Uuid>, State(pool): State<PgPool>) -> impl IntoResponse {
    match
        sqlx
            ::query_as::<_, User>("SELECT * FROM users WHERE id = $1")
            .bind(id)
            .fetch_optional(&pool).await
    {
        Ok(Some(user)) => (StatusCode::OK, Json(user)).into_response(),
        Ok(None) => StatusCode::NOT_FOUND.into_response(),
        Err(_) => StatusCode::INTERNAL_SERVER_ERROR.into_response(),
    }
}

pub async fn create_user(
    State(pool): State<PgPool>,
    Json(payload): Json<CreateUser>
) -> impl IntoResponse {
    match
        sqlx
            ::query_as::<_, User>("INSERT INTO users (name, email) VALUES ($1, $2) RETURNING *")
            .bind(&payload.name)
            .bind(&payload.email)
            .fetch_one(&pool).await
    {
        Ok(user) => (StatusCode::CREATED, Json(user)).into_response(),
        Err(_) => StatusCode::INTERNAL_SERVER_ERROR.into_response(),
    }
}

pub async fn update_user(
    Path(id): Path<Uuid>,
    State(pool): State<PgPool>,
    Json(payload): Json<CreateUser>
) -> impl IntoResponse {
    match
        sqlx
            ::query_as::<_, User>(
                "UPDATE users SET name = $1, email = $2 WHERE id = $3 RETURNING *"
            )
            .bind(&payload.name)
            .bind(&payload.email)
            .bind(id)
            .fetch_optional(&pool).await
    {
        Ok(Some(user)) => (StatusCode::OK, Json(user)).into_response(),
        Ok(None) => StatusCode::NOT_FOUND.into_response(),
        Err(_) => StatusCode::INTERNAL_SERVER_ERROR.into_response(),
    }
}

pub async fn delete_user(Path(id): Path<Uuid>, State(pool): State<PgPool>) -> impl IntoResponse {
    match sqlx::query("DELETE FROM users WHERE id = $1").bind(id).execute(&pool).await {
        Ok(result) => {
            if result.rows_affected() == 0 { StatusCode::NOT_FOUND } else { StatusCode::NO_CONTENT }
        }
        Err(_) => StatusCode::INTERNAL_SERVER_ERROR,
    }
}
4.2. Register Routes in main.rs
Update main.rs:
mod db;
mod handlers;
mod models;

use axum::{ routing::{ get }, Router };
use db::connect_db;
use dotenvy::dotenv;
use handlers::*;
use std::{ net::SocketAddr };

#[tokio::main]
async fn main() {
    dotenv().ok();
    let pool = connect_db().await;

    let app = Router::new()
        .route("/users", get(get_users).post(create_user))
        .route("/users/{id}", get(get_user).put(update_user).delete(delete_user))
        .with_state(pool);

    let addr = SocketAddr::from(([127, 0, 0, 1], 3000));
    println!("🚀 Server running at http://{}", addr);

    axum::serve(tokio::net::TcpListener::bind(addr).await.unwrap(), app).await.unwrap();
}
Now you can run the app:
cargo runTest it with curl or tools like Postman or Hoppscotch:
📥 Create User (POST /users)
curl -X POST http://127.0.0.1:3000/users \
  -H "Content-Type: application/json" \
  -d '{"name":"Alice","email":"[email protected]"}'
📤 Get All Users (GET /users)
curl http://127.0.0.1:3000/users📄 Get User by ID (GET /users/{id})
curl http://localhost:3000/users/{uuid}✏️ Update User (PUT /users/{id})
curl -X PUT http://localhost:3000/users/{uuid} \
  -H "Content-Type: application/json" \
  -d '{"name":"Alice Updated","email":"[email protected]"}'
❌ Delete User (DELETE /users/{id})
curl -X DELETE http://localhost:3000/users/{uuid}
5. Add Input Validation with validator
🔧 1. Update Cargo.toml
Add the validator crate and enable integration with serde:
validator = { version = "0.18", features = ["derive"] }🧱 2. Update the User Request Struct
In your models.rs or dto.rs, update the request structs like so:
use serde::{Deserialize, Serialize};
use validator::Validate;

#[derive(Debug, Deserialize, Validate)]
pub struct CreateUser {
    #[validate(length(min = 3, message = "Name must be at least 3 characters"))]
    pub name: String,

    #[validate(email(message = "Email must be valid"))]
    pub email: String,
}
You can do the same for an UpdateUser struct.
🧠 3. Create a Validation Extractor
Create a reusable extractor in a new file like validation.rs:
use axum::{ extract::{ FromRequest, Json }, http::{ Request, StatusCode }, body::Body };
use serde::de::DeserializeOwned;
use std::{ ops::Deref };
use validator::Validate;

pub struct ValidatedJson<T>(pub T);

impl<T> Deref for ValidatedJson<T> {
    type Target = T;
    fn deref(&self) -> &Self::Target {
        &self.0
    }
}

impl<S, T> FromRequest<S, Body>
    for ValidatedJson<T>
    where S: Send + Sync, T: DeserializeOwned + Validate + Send + 'static
{
    type Rejection = (StatusCode, String);

    fn from_request<'a>(
        req: Request<Body>,
        state: &'a S
    ) -> impl std::future::Future<
        Output = Result<Self, <Self as FromRequest<S, Body>>::Rejection>
    > +
        Send {
        Box::pin(async move {
            let Json(value) = Json::<T>
                ::from_request(req, state).await
                .map_err(|e| (StatusCode::BAD_REQUEST, format!("JSON error: {}", e)))?;

            value
                .validate()
                .map_err(|e| (
                    StatusCode::UNPROCESSABLE_ENTITY,
                    format!("Validation error: {}", e),
                ))?;

            Ok(ValidatedJson(value))
        })
    }
}
✍️ 4. Use It in Handlers
Update your create_user handler in handlers.rs:
use axum::{ extract::{ Path, State }, http::StatusCode, response::IntoResponse, Json };
use sqlx::PgPool;
use uuid::Uuid;
use crate::{
models::{ CreateUser, User },
validation::ValidatedJson, // updated: only need this now
};
pub async fn get_users(State(pool): State<PgPool>) -> impl IntoResponse {
match sqlx::query_as::<_, User>("SELECT * FROM users").fetch_all(&pool).await {
Ok(users) => (StatusCode::OK, Json(users)).into_response(),
Err(_) => StatusCode::INTERNAL_SERVER_ERROR.into_response(),
}
}
pub async fn get_user(Path(id): Path<Uuid>, State(pool): State<PgPool>) -> impl IntoResponse {
match
sqlx
::query_as::<_, User>("SELECT * FROM users WHERE id = $1")
.bind(id)
.fetch_optional(&pool).await
{
Ok(Some(user)) => (StatusCode::OK, Json(user)).into_response(),
Ok(None) => StatusCode::NOT_FOUND.into_response(),
Err(_) => StatusCode::INTERNAL_SERVER_ERROR.into_response(),
}
}
// ✅ updated: no longer accepts raw Request
pub async fn create_user(
State(_pool): State<PgPool>, // optional if you need DB access
ValidatedJson(payload): ValidatedJson<CreateUser>
) -> impl IntoResponse {
// At this point, `payload` is already validated
format!("Received user: {:?}", payload.name)
}
// optional: you can also change this to use ValidatedJson
pub async fn update_user(
Path(id): Path<Uuid>,
State(pool): State<PgPool>,
ValidatedJson(payload): ValidatedJson<CreateUser>
) -> impl IntoResponse {
match
sqlx
::query_as::<_, User>(
"UPDATE users SET name = $1, email = $2 WHERE id = $3 RETURNING *"
)
.bind(&payload.name)
.bind(&payload.email)
.bind(id)
.fetch_optional(&pool).await
{
Ok(Some(user)) => (StatusCode::OK, Json(user)).into_response(),
Ok(None) => StatusCode::NOT_FOUND.into_response(),
Err(_) => StatusCode::INTERNAL_SERVER_ERROR.into_response(),
}
}
pub async fn delete_user(Path(id): Path<Uuid>, State(pool): State<PgPool>) -> impl IntoResponse {
match sqlx::query("DELETE FROM users WHERE id = $1").bind(id).execute(&pool).await {
Ok(result) => {
if result.rows_affected() == 0 { StatusCode::NOT_FOUND } else { StatusCode::NO_CONTENT }
}
Err(_) => StatusCode::INTERNAL_SERVER_ERROR,
}
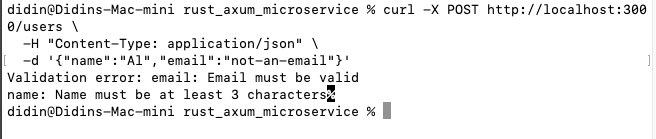
}✅ 5. Test It
Send a request with missing/invalid fields:
curl -X POST http://localhost:3000/users \
  -H "Content-Type: application/json" \
  -d '{"name":"Al","email":"not-an-email"}'
You should get a 422 Unprocessable Entity response with validation errors.
6. Adding Service-to-Service Communication
📦 Step 1: Add reqwest to Cargo.toml
[dependencies]
reqwest = { version = "0.12", features = ["json"] }
axum = "0.8.4"
tokio = { version = "1", features = ["full"] }
serde = { version = "1.0", features = ["derive"] }
serde_json = "1.0"
sqlx = { version = "0.8.6", features = [
    "postgres",
    "runtime-tokio-rustls",
    "macros",
    "uuid",                 # 👈 Add this line
] }
dotenvy = "0.15"
tower = "0.5.2"
thiserror = "2.0.12"
uuid = { version = "1", features = ["v4", "serde"] }
hyper = { version = "0.14.27", features = ["full"] }
validator = { version = "0.18.0", features = ["derive"] }
async-trait = "0.1"
axum-extra = "0.9"
📁 Step 2: Add a helper module for making requests
Create a file src/client/email_client.rs:
use reqwest::Client;
use serde::Serialize;

#[derive(Serialize)]
pub struct EmailPayload {
    pub to: String,
    pub subject: String,
    pub body: String,
}

#[derive(Clone)] // ✅ Add this
pub struct EmailClient {
    client: Client,
    base_url: String,
}

impl EmailClient {
    pub fn new(base_url: String) -> Self {
        EmailClient {
            client: Client::new(),
            base_url,
        }
    }

    pub async fn send_email(&self, payload: &EmailPayload) -> Result<(), reqwest::Error> {
        let url = format!("{}/send", self.base_url);
        self.client.post(&url).json(payload).send().await?.error_for_status()?; // ensure it's a 2xx response
        Ok(())
    }
}
Create a file src/client/mod.rs:
pub mod email_client;🧩 Step 3: Inject the EmailClient into your app state
Modify your app state (e.g., in main.rs):
mod client;
use client::email_client::{ EmailClient };

#[derive(Clone)]
struct AppState {
    db_pool: PgPool,
    email_client: EmailClient,
}
🔧 Step 4: Update main() to pass the service URL
#[tokio::main]
async fn main() {
    dotenv().ok();
    let pool = connect_db().await;

    let app_state = AppState {
        db_pool: pool.clone(),
        email_client: EmailClient::new("http://localhost:4000".to_string()),
    };

    let app = Router::new()
        .route("/users", get(get_users).post(create_user))
        .route("/users/:id", get(get_user).put(update_user).delete(delete_user))
        .with_state(app_state.clone());

    let addr = SocketAddr::from(([127, 0, 0, 1], 3000));
    println!("🚀 Server running at http://{}", addr);

    axum::serve(tokio::net::TcpListener::bind(addr).await.unwrap(), app).await.unwrap();
}
🧪 Step 5: Use email_client in a handler
Update create_user handler to send a welcome email:
use axum::{ extract::{ Path, State }, http::{ StatusCode }, response::IntoResponse, Json };
use uuid::Uuid;

use crate::{
    client::email_client::EmailPayload,
    models::{ CreateUser, User },
    validation::ValidatedJson,
    AppState, // updated: only need this now
};

pub async fn get_users(State(state): State<AppState>) -> impl IntoResponse {
    match sqlx::query_as::<_, User>("SELECT * FROM users").fetch_all(&state.db_pool).await {
        Ok(users) => (StatusCode::OK, Json(users)).into_response(),
        Err(_) => StatusCode::INTERNAL_SERVER_ERROR.into_response(),
    }
}

pub async fn get_user(Path(id): Path<Uuid>, State(state): State<AppState>) -> impl IntoResponse {
    match
        sqlx
            ::query_as::<_, User>("SELECT * FROM users WHERE id = $1")
            .bind(id)
            .fetch_optional(&state.db_pool).await
    {
        Ok(Some(user)) => (StatusCode::OK, Json(user)).into_response(),
        Ok(None) => StatusCode::NOT_FOUND.into_response(),
        Err(_) => StatusCode::INTERNAL_SERVER_ERROR.into_response(),
    }
}

pub async fn create_user(
    State(state): State<AppState>,
    ValidatedJson(user): ValidatedJson<CreateUser>
) -> impl IntoResponse {
    let payload = EmailPayload {
        to: user.email.clone(),
        subject: "Welcome!".to_string(),
        body: format!("Hello {}, welcome to our service!", user.name),
    };

    if let Err(e) = state.email_client.send_email(&payload).await {
        eprintln!("❌ Failed to send email: {:?}", e);
    }

    (StatusCode::CREATED, format!("Received user: {:?}", user.name))
}

// optional: you can also change this to use ValidatedJson
pub async fn update_user(
    Path(id): Path<Uuid>,
    State(state): State<AppState>,
    ValidatedJson(payload): ValidatedJson<CreateUser>
) -> impl IntoResponse {
    match
        sqlx
            ::query_as::<_, User>(
                "UPDATE users SET name = $1, email = $2 WHERE id = $3 RETURNING *"
            )
            .bind(&payload.name)
            .bind(&payload.email)
            .bind(id)
            .fetch_optional(&state.db_pool).await
    {
        Ok(Some(user)) => (StatusCode::OK, Json(user)).into_response(),
        Ok(None) => StatusCode::NOT_FOUND.into_response(),
        Err(_) => StatusCode::INTERNAL_SERVER_ERROR.into_response(),
    }
}

pub async fn delete_user(Path(id): Path<Uuid>, State(state): State<AppState>) -> impl IntoResponse {
    match sqlx::query("DELETE FROM users WHERE id = $1").bind(id).execute(&state.db_pool).await {
        Ok(result) => {
            if result.rows_affected() == 0 { StatusCode::NOT_FOUND } else { StatusCode::NO_CONTENT }
        }
        Err(_) => StatusCode::INTERNAL_SERVER_ERROR,
    }
}
7. Triggering Email Service via a Separate Axum Microservice
🧩 Goal
We’ll separate the email logic into a new Axum-based microservice that exposes a simple HTTP endpoint (e.g. POST /send) to trigger emails. The User Service will use an EmailClient to call this endpoint.
🧱 Step 1: Create a New Rust Project for Email Service
cargo new email-service
cd email-service
Update Cargo.toml dependencies:
[dependencies]
axum = "0.8.4"
tokio = { version = "1", features = ["full"] }
serde = { version = "1.0", features = ["derive"] }
serde_json = "1.0"
tower = "0.5.2"
📝 Step 2: Define the Email Payload Struct
// src/models.rs
use serde::Deserialize;

#[derive(Deserialize)]
pub struct EmailRequest {
    pub to: String,
    pub subject: String,
    pub body: String,
}
🚀 Step 3: Create the Email Sending Handler
// src/handlers.rs
use axum::{Json, response::IntoResponse};
use crate::models::EmailRequest;

pub async fn send_email(Json(payload): Json<EmailRequest>) -> impl IntoResponse {
    // Simulate sending email
    println!("📧 Sending email to: {}\nSubject: {}\nBody:\n{}",
        payload.to, payload.subject, payload.body);

    // Respond with 202 Accepted
    (axum::http::StatusCode::ACCEPTED, "Email sent")
}
🛠 Step 4: Set Up Axum App
// src/main.rs
mod handlers;
mod models;

use axum::{Router, routing::post};
use std::net::SocketAddr;
use handlers::send_email;

#[tokio::main]
async fn main() {
    let app = Router::new().route("/send", post(send_email));

    let addr = SocketAddr::from(([127, 0, 0, 1], 4000));
    println!("📨 Email service running at http://{}", addr);
    axum::serve(tokio::net::TcpListener::bind(addr).await.unwrap(), app).await.unwrap();
}
Run the service:
cargo runThis runs the email service on http://localhost:4000/send.
🤝 Step 5: Call Email Service from User Service
In your main Axum app (User Service), update client/email_client.rs:
// client/email_client.rs
use serde::Serialize;

#[derive(Serialize)]
struct EmailPayload {
    to: String,
    subject: String,
    body: String,
}

#[derive(Clone)]
pub struct EmailClient {
    base_url: String,
    client: reqwest::Client,
}

impl EmailClient {
    pub fn new(base_url: String) -> Self {
        Self {
            base_url,
            client: reqwest::Client::new(),
        }
    }

    pub async fn send_email(
        &self,
        to: &str,
        subject: &str,
        body: &str,
    ) -> Result<(), reqwest::Error> {
        let payload = EmailPayload {
            to: to.to_string(),
            subject: subject.to_string(),
            body: body.to_string(),
        };

        self.client
            .post(format!("{}/send", self.base_url))
            .json(&payload)
            .send()
            .await?
            .error_for_status()?; // returns error if not 2xx

        Ok(())
    }
}
Use EmailClient in your handler:
let _ = email_client.send_email(
    &user.email,
    "Welcome!",
    "Thanks for signing up!"
).await;
✅ Result
-
email-servicehandles email logic independently. -
user-serviceuses HTTP to communicate with the email service. -
Services are loosely coupled and can scale independently.
8. Dockerizing user_service and email_service
We’ll create a Dockerfile for each service and a docker-compose.yml to manage both.
📦 1. Dockerfile for user_service
Create user_service/Dockerfile:
FROM rust:1.88.0-slim

WORKDIR /app

# Install dependencies
RUN apt-get update && apt-get install -y libpq-dev pkg-config

# Cache dependencies
COPY Cargo.toml Cargo.lock ./
COPY ./src ./src
COPY ./client ./client
COPY ./db ./db
COPY ./handlers ./handlers
COPY ./models ./models
COPY ./validation ./validation

RUN cargo build --release

CMD ["./target/release/user_service"]
📦 2. Dockerfile for email_service
Create email_service/Dockerfile:
FROM rust:1.88.0-slim

WORKDIR /app

COPY Cargo.toml Cargo.lock ./
COPY ./src ./src

RUN cargo build --release

CMD ["./target/release/email_service"]
⚙️ 3. Create a docker-compose.yml
At the root (same level as both service folders), create docker-compose.yml:
version: "3.9"

services:
  db:
    image: postgres:16
    environment:
      POSTGRES_USER: user
      POSTGRES_PASSWORD: password
      POSTGRES_DB: users_db
    ports:
      - "5432:5432"
    volumes:
      - pgdata:/var/lib/postgresql/data

  user_service:
    build:
      context: ./user_service
    environment:
      DATABASE_URL: postgres://user:password@db:5432/users_db
    depends_on:
      - db
      - email_service
    ports:
      - "3000:3000"

  email_service:
    build:
      context: ./email_service
    ports:
      - "4000:4000"

volumes:
  pgdata:
🛠️ 4. Update user_service/.env
DATABASE_URL=postgres://user:password@db:5432/users_dbAnd use .env for connect_db() like this:
use sqlx::postgres::PgPoolOptions;
use sqlx::PgPool;

pub async fn connect_db() -> PgPool {
    PgPoolOptions::new()
        .connect(&std::env::var("DATABASE_URL").unwrap()).await
        .expect("Failed to connect to DB")
}
🚀 5. Build and Run Everything
From the root folder:
docker-compose build
docker-compose up-
user_service→ http://localhost:3000 -
email_service→ http://localhost:4000 -
Postgres→ port 5432
✅ Final Notes
-
You now have two independent Axum microservices managed via Docker Compose.
-
You can deploy them to any container platform (like Kubernetes, ECS, or Fly.io).
-
You can scale
email_serviceindependently if needed.
9. API Gateway Implementation with Axum
We’ll create a new Axum-based Rust project called api_gateway.
📁 1. Project Structure
Create a new folder called api_gateway:
cargo new api_gatewayFolder structure after setup:
api_gateway/
├── Cargo.toml
├── src/
│   └── main.rs
🦀 2. Cargo.toml Dependencies
Update api_gateway/Cargo.toml:
[package]
name = "api_gateway"
version = "0.1.0"
edition = "2024"

[dependencies]
axum = "0.8.4"
tokio = { version = "1.37", features = ["full"] }
hyper = { version = "1", features = ["full"] }
reqwest = { version = "0.12", features = ["json", "stream", "gzip"] }
tower-http = { version = "0.6.6", features = ["cors"] }
dotenvy = "0.15"
tracing-subscriber = "0.3"
🧠 3. Gateway Logic in main.rs
Update api_gateway/src/main.rs:
use axum::{
    body::Body,
    http::{Request, StatusCode, Uri},
    response::IntoResponse,
    routing::any,
    Router,
};
use std::{convert::Infallible, net::SocketAddr};
use tower_http::cors::{Any, CorsLayer};
use hyper::Client;

async fn proxy(req: Request<Body>) -> impl IntoResponse {
    let uri = req.uri().clone();
    let path = uri.path();

    // Determine target service based on path prefix
    let target_base = if path.starts_with("/users") {
        "http://user_service:3000"
    } else if path.starts_with("/email") {
        "http://email_service:4000"
    } else {
        return Err((StatusCode::NOT_FOUND, "Unknown route"));
    };

    // Build the proxied URI
    let mut parts = uri.into_parts();
    parts.scheme = Some("http".parse().unwrap());
    parts.authority = Some(
        target_base
            .replace("http://", "")
            .parse()
            .expect("Invalid URI authority"),
    );
    let new_uri = Uri::from_parts(parts).unwrap();

    // Build and send the request
    let client = Client::new();
    let proxied_req = Request::builder()
        .method(req.method())
        .uri(new_uri)
        .body(req.into_body())
        .unwrap();

    let response = client.request(proxied_req).await;

    Ok::<_, (StatusCode, &'static str)>(response.map_err(|_| (StatusCode::BAD_GATEWAY, "Service unreachable"))?)
}

#[tokio::main]
async fn main() {
    dotenvy::dotenv().ok();
    tracing_subscriber::fmt::init();

    let app = Router::new()
        .route("/*path", any(proxy)) // catch-all proxy route
        .layer(CorsLayer::new().allow_origin(Any));

    let addr = SocketAddr::from(([0, 0, 0, 0], 8080));
    println!("🧭 API Gateway listening at http://{}", addr);

    axum::serve(tokio::net::TcpListener::bind(addr).await.unwrap(), app)
        .await
        .unwrap();
}
🐳 4. Add Gateway to docker-compose.yml
Update the docker-compose.yml to include api_gateway:
  api_gateway:
    build:
      context: ./api_gateway
    ports:
      - "8080:8080"
    depends_on:
      - user_service
      - email_service
Also, add api_gateway/Dockerfile:
# api_gateway/Dockerfile
FROM rust:1.88.0-slim

WORKDIR /app

COPY Cargo.toml Cargo.lock ./
COPY ./src ./src

RUN cargo build --release

CMD ["./target/release/api_gateway"]
🧪 5. Test the Gateway
Start everything:
docker-compose up --buildNow you can access both services through the API Gateway:
-
GET http://localhost:8080/users -
POST http://localhost:8080/users -
POST http://localhost:8080/email/send
✅ What We Have Now
| Component | URL |
|---|---|
| API Gateway | http://localhost:8080 |
| User Service | http://localhost:3000 |
| Email Service | http://localhost:4000 |
| PostgreSQL | localhost:5432 (internal only) |
Conclusion
In this tutorial, you've successfully built a modern microservices architecture in Rust using the Axum framework, demonstrating the power of modular and scalable system design. Here's what you've accomplished:
-
User Service: A full-featured Axum-based REST API with PostgreSQL and
sqlx, handling user data operations and integrating input validation. -
Email Service: A lightweight, independent service responsible for sending emails, ready to scale or plug into a real SMTP provider.
-
Dockerization: Each service is containerized and orchestrated via Docker Compose, making local development and deployment consistent and straightforward.
-
API Gateway: A unified access point that routes requests to the appropriate service, simplifying external API exposure and centralizing cross-cutting concerns.
This architecture lays a solid foundation for further enhancements, such as:
-
Service discovery and distributed tracing
-
Centralized logging and monitoring
-
Authentication and authorization (JWT, OAuth2, etc.)
-
Rate limiting, retries, and circuit breakers
By decoupling responsibilities into distinct services, you've embraced a scalable, maintainable approach that's ready for production workloads in the Rust ecosystem.
You can find the full source code on our GitHub:
That's just the basics. If you need more deep learning about Rust, you can take the following cheap course:
- Learn to Code with Rust
- Rust: The Complete Developer's Guide
- Master The Rust Programming Language : Beginner To Advanced
- Embedded Rust Development with STM32: Absolute Beginners
- Build an AutoGPT Code Writing AI Tool With Rust and GPT-4
- Rust Programming Bootcamp - 100 Projects in 100 Days
- Learn Rust by Building Real Applications
- Building web APIs with Rust (advanced)
- Developing P2P Applications with Rust
- Real time web applications in Rust
Thanks!