
Building fast and scalable applications is no longer enough in today's cloud-native and microservices-driven world — securing those applications is equally critical. As developers decompose monoliths into distributed microservices, they face new challenges around security, traffic management, authentication, and observability.
This is where an API Gateway becomes essential.
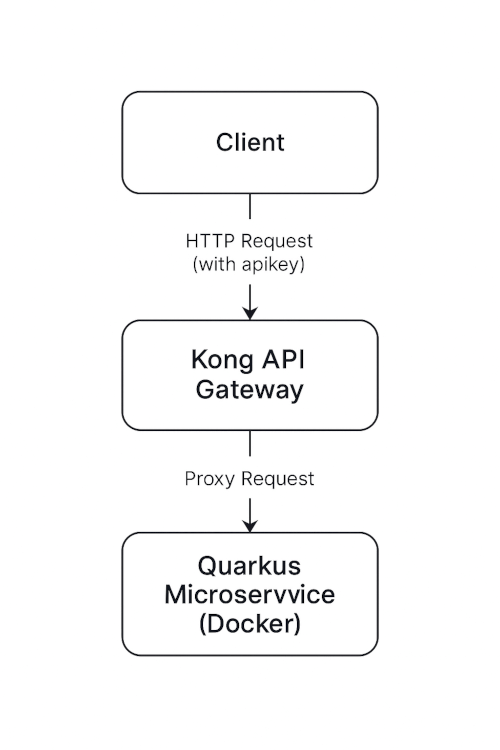
Kong is a popular, open-source API gateway and microservice management layer. It acts as a single entry point for all incoming API traffic, providing powerful features like rate limiting, authentication, logging, and traffic transformation — all configurable via a simple Admin API.
In this tutorial, you will learn how to secure a Quarkus-based microservice using Kong API Gateway. We’ll walk through:
- Building and containerizing a Quarkus REST API
- Setting up Kong with Docker and configuring services/routes
- Applying Kong plugins for authentication and rate limiting
- Testing access control through the gateway
By the end of this guide, you’ll have a fully functioning Quarkus microservice secured via Kong, ready to handle production-level concerns like access control and traffic management.
Prerequisites
Before diving into securing Quarkus microservices with Kong, make sure you have the following tools and knowledge ready:
Technical Requirements
- Java 17 or later installed
- Apache Maven (for building the Quarkus project)
- Docker and Docker Compose are installed and running
- An HTTP client tool, such as HTTPie or curl, for testing Kong's Admin API
- A modern code editor or IDE (e.g., VS Code, IntelliJ IDEA)
Basic Knowledge
- Familiarity with Java and basic RESTful APIs
- Understanding of Quarkus or similar Java frameworks
- Basic experience with Docker
- General understanding of what an API Gateway does
You don’t need to be a Kong expert — we’ll walk through each configuration step-by-step using Kong’s Admin API and Dockerized setup.
1. Setting Up the Quarkus Microservice
To begin, we’ll create a simple Quarkus REST API that will later be secured via Kong. This service will expose a sample endpoint that returns a basic message.
1.1 Generate a Quarkus Project
You can generate a new Quarkus project using the Quarkus Starter or via the CLI. For this tutorial, we’ll use Maven:
mvn io.quarkus:quarkus-maven-plugin:3.22.3:create \
    -DprojectGroupId=com.djamware \
    -DprojectArtifactId=secure-quarkus-service \
    -DclassName="com.djamware.api.SecureResource" \
    -Dpath="/api/secure" \
    -Dextensions="resteasy-reactive"
This command creates a new Quarkus project with a REST endpoint using the RESTEasy Reactive extension.
1.2 Explore the Project Structure
After generating the project, you’ll have the following structure:
secure-quarkus-service/
├── src/
│   └── main/
│       └── java/com/djamware/api/SecureResource.java
├── pom.xml
The SecureResource.java class will look like this by default:
package com.djamware.api;

import jakarta.ws.rs.GET;
import jakarta.ws.rs.Path;
import jakarta.ws.rs.Produces;
import jakarta.ws.rs.core.MediaType;

@Path("/api/secure")
public class SecureResource {

    @GET
    @Produces(MediaType.TEXT_PLAIN)
    public String hello() {
        return "Hello from Quarkus REST";
    }
}
1.3 Run the Quarkus Application
To run the application in development mode:
cd secure-quarkus-service
mvn quarkus:dev
Visit http://localhost:8080/api/secure in your browser or run:
curl http://localhost:8080/api/secureYou should see:

Once the microservice is working, we’re ready to Dockerize it for deployment with Kong.
2. Dockerizing the Quarkus Microservice
To deploy our Quarkus microservice alongside Kong using Docker Compose, we need to containerize it. Quarkus makes this straightforward with its native support for container builds. We don't need to add a Dockerfile because it is generated while creating a Quarkus application.
2.1 Build the Docker Image
Make sure Docker is running, then build the image:
docker build -f src/main/docker/Dockerfile.jvm -t secure-quarkus-service .2.2 Run the Container
You can test the Docker container locally:
docker run -i --rm -p 8080:8080 secure-quarkus-serviceAccess it again via:
curl http://localhost:8080/api/secureYou should see:
Hello from Quarkus RESTNow that the microservice is containerized and running, we're ready to configure Kong API Gateway and expose this service securely.
3. Setting Up Kong API Gateway with Docker
We’ll run Kong along with its required PostgreSQL database using Docker Compose. Kong will act as a reverse proxy in front of your Quarkus microservice.
3.1 Create docker-compose.yml File
In your project root (or a separate folder), create a file named docker-compose.yml with the following content:
version: '3.8'

services:
  kong-database:
    image: postgres:13
    container_name: kong-db
    environment:
      POSTGRES_USER: kong
      POSTGRES_DB: kong
      POSTGRES_PASSWORD: kong
    ports:
      - "5432:5432"
    volumes:
      - kong-db-data:/var/lib/postgresql/data

  kong-migrations:
    image: kong:3.6
    command: kong migrations bootstrap
    depends_on:
      - kong-database
    environment:
      KONG_DATABASE: postgres
      KONG_PG_HOST: kong-database
      KONG_PG_USER: kong
      KONG_PG_PASSWORD: kong
      KONG_PASSWORD: kong

  kong:
    image: kong:3.6
    container_name: kong
    restart: always
    depends_on:
      - kong-database
    ports:
      - "8000:8000"       # Kong proxy
      - "8443:8443"       # Kong proxy (SSL)
      - "8001:8001"       # Kong Admin API
      - "8444:8444"       # Kong Admin API (SSL)
    environment:
      KONG_DATABASE: postgres
      KONG_PG_HOST: kong-database
      KONG_PG_USER: kong
      KONG_PG_PASSWORD: kong
      KONG_ADMIN_ACCESS_LOG: /dev/stdout
      KONG_ADMIN_ERROR_LOG: /dev/stderr
      KONG_PROXY_ACCESS_LOG: /dev/stdout
      KONG_PROXY_ERROR_LOG: /dev/stderr
      KONG_ADMIN_LISTEN: 0.0.0.0:8001, 0.0.0.0:8444

volumes:
  kong-db-data:
3.2 Start Kong and PostgreSQL
Run the following command in the same directory as your docker-compose.yml file:
docker-compose up -dThis will:
- Launch a PostgreSQL container
- Run Kong's initial database migrations
- Start the Kong Gateway
3.3 Verify Kong Is Running
Once started, verify Kong is working by accessing its Admin API:
curl http://localhost:8001/You should see JSON output with version info like:
{"hostname":"127f9be14d79","edition":"community",...}Kong is now ready to act as your microservices gateway.
4. Registering the Quarkus Microservice with Kong
Kong uses Services and Routes to manage upstream APIs. A Service represents your Quarkus API, and a Route defines how Kong exposes it.
Let’s register your Quarkus microservice running at http://host.docker.internal:8080 (on macOS/Windows) or http://<your-local-IP>:8080 (on Linux).
4.1 Create a Service
Run this command to register the Quarkus API as a service in Kong:
curl -i -X POST http://localhost:8001/services \
  --data name=quarkus-service \
  --data url=http://host.docker.internal:8080
🔍 host.docker.internal allows containers to reach services on your host machine (works on macOS & Windows).
You should get a 201 Created response with the service JSON.
4.2 Add a Route to the Service
Now define a route to expose that service:
curl -i -X POST http://localhost:8001/services/quarkus-service/routes \
  --data name=quarkus-route \
  --data 'paths[]=/quarkus-api'
This means that when you send a request to http://localhost:8000/quarkus-api, Kong will proxy it to your Quarkus service.
4.3 Test the Proxy Route
Now, try accessing your API through Kong:
curl http://localhost:8000/quarkus-api/api/secureYou should get:
Hello from Quarkus REST🎉 Kong is now routing traffic to your Quarkus microservice!
5. Securing the API with Key Authentication
Kong’s Key Authentication plugin protects your routes by requiring a valid API key in the request. Here’s how to enable and use it:
5.1 Enable the Key Auth Plugin on the Route
Use this command to enable the plugin on your quarkus-route:
curl -i -X POST http://localhost:8001/routes/quarkus-route/plugins \
  --data name=key-auth
This tells Kong to require a valid API key (via header apikey) on any request to /quarkus-api.
5.2 Create a Consumer
A consumer represents a user or client accessing your API. Let’s create one:
curl -i -X POST http://localhost:8001/consumers \
  --data username=quarkus-client
5.3 Generate an API Key for the Consumer
curl -i -X POST http://localhost:8001/consumers/quarkus-client/key-authYou’ll receive a JSON response like:
{"ttl":null,"created_at":1748050207,"id":"11df8505-b06d-417c-8c6f-7a08291f7fe0","key":"zxV79sBcOAmRdWdmZhbF1J9VJ4Pw0Gnd","tags":null,"consumer":{"id":"071fb13d-49db-4440-ab09-2628a74b09bb"}}📝 Copy the key value — you'll use it in API requests.
5.4 Test the Secured Endpoint
Try accessing your endpoint without an API key:
curl http://localhost:8000/quarkus-api/api/secureYou’ll get a 401 Unauthorized:
{
  "message":"No API key found in request",
  "request_id":"eb09961896e4923aed8a445365763b2a"
}
Now try again with the API key:
curl --header "apikey: zxV79sBcOAmRdWdmZhbF1J9VJ4Pw0Gnd" \
  http://localhost:8000/quarkus-api/api/secure
You should see the expected response:
Hello from Quarkus REST✅ You’ve now successfully secured your Quarkus microservice using Kong’s API gateway with key authentication.
6. Optional: Adding a Developer Portal or Rate Limiting
6.1 Enabling Rate Limiting
Rate limiting helps prevent abuse and ensures fair usage of your API. Kong provides a plugin called rate-limiting.
Let’s enable it for the quarkus-route:
curl -i -X POST http://localhost:8001/routes/quarkus-route/plugins \
  --data name=rate-limiting \
  --data config.minute=5 \
  --data config.policy=local
This configuration:
- Allows 5 requests per minute
- Uses the local policy (rate limits are stored in Kong’s memory)
You can also use the redis policy for distributed rate limiting in clustered environments.
Try hitting the endpoint more than 5 times in a minute:
for i in {1..6}; do
  curl --header "apikey: zxV79sBcOAmRdWdmZhbF1J9VJ4Pw0Gnd" http://localhost:8000/quarkus-api/api/secure && echo
done
The 6th request should return:
{
  "message":"API rate limit exceeded",
  "request_id":"7a94a854bb4bb57be349e06e5c8cf76d"
}
6.2 Developer Portal (Enterprise Only)
Kong provides a Developer Portal for teams using Kong Enterprise. It allows you to:
- Expose your APIs
- Share documentation (like Swagger/OpenAPI)
- Let developers self-register and obtain API keys
If you're using the OSS version of Kong (which we are in this tutorial), the Developer Portal is not included.
However, you can integrate external tools like:
- Swagger UI
- Redoc
- Static docs sites (e.g., Docusaurus)
You could also create a lightweight developer portal yourself using:
- A frontend (React, Vue, etc.)
- Kong Admin API for key management
- Documentation pages with usage examples
🔐 Summary of Enhancements
| Feature | Plugin/API | Purpose |
|---|---|---|
| Authentication | `key-auth` | Restrict access via API keys |
| Rate Limiting | `rate-limiting` | Prevent abuse and throttle usage |
| Developer Access | Kong Admin API | Manage consumers and credentials |
| API Documentation | Swagger, Redoc | Help devs understand your endpoints |
7. Managing API Keys Programmatically via Kong Admin API
Kong provides a RESTful Admin API that lets you manage Consumers and their API keys. You can use it from any backend system (e.g., Node.js, Python, Go) or CLI tools like curl.
7.1 Create a New Consumer (User or Client)
curl -i -X POST http://localhost:8001/consumers \
  --data username=new-user
Optional: add custom metadata (e.g., email, tags):
curl -i -X POST http://localhost:8001/consumers \
  --data username=new-user \
  --data custom_id=12345 \
  --data tags=client \
  --data tags=free-tier
7.2 Generate an API Key for the Consumer
curl -i -X POST http://localhost:8001/consumers/new-user/key-authResponse:
{"ttl":null,"created_at":1748050917,"id":"82235ec8-d311-4a4d-8a7f-7f081af3a758","key":"FeEeu1TIou0ak9b6ujGGmPVT3Rfw7gfP","tags":null,"consumer":{"id":"0ee0a5d4-0a09-4011-b193-14fbec8a73f7"}}🔐 You can now send this key to the user via email or the dashboard.
7.3 List All Keys for a Consumer
curl http://localhost:8001/consumers/new-user/key-auth7.4 Revoke (Delete) an API Key
Use the key ID or key value to delete:
curl -i -X DELETE http://localhost:8001/consumers/new-user/key-auth/{key_or_id}Example:
curl -i -X DELETE http://localhost:8001/consumers/new-user/key-auth/a9f8n3jdg934hf3n7.5 Rotate an API Key
There’s no direct "rotate" action. Just delete the old key and create a new one:
# Step 1: Delete old key
curl -i -X DELETE http://localhost:8001/consumers/new-user/key-auth/old-key

# Step 2: Create new key
curl -i -X POST http://localhost:8001/consumers/new-user/key-auth
🛠️ Pro Tip: Automate This in Code
Use your backend to expose a /register or /get-key endpoint that interacts with Kong’s Admin API, like:
// Node.js Example using Axios
const axios = require('axios');

async function createConsumer(username) {
  await axios.post('http://localhost:8001/consumers', { username });
  const res = await axios.post(`http://localhost:8001/consumers/${username}/key-auth`);
  return res.data.key;
}
You could then show this key in a user dashboard or send it via email.
Conclusion
In this tutorial, you learned how to secure Quarkus microservices using Kong API Gateway. Starting from Dockerizing a Quarkus app, you deployed Kong with Docker, registered your microservice, and enforced key-based authentication using Kong’s powerful plugin system. You also added rate limiting to throttle traffic and explored how to manage API keys programmatically via Kong’s Admin API.
These practices not only secure your microservices but also help you scale API access and simplify developer onboarding. With Kong’s flexibility and Quarkus’s performance, you now have a production-ready foundation for secure microservices in the cloud or on-prem.
You can find the full source code on our GitHub.
That just the basic. If you need more deep learning about Java and Spring Framework you can take the following cheap course:
- Java basics, Java in Use //Complete course for beginners
- Java Programming: Master Basic Java Concepts
- Master Java Web Services and REST API with Spring Boot
- JDBC Servlets and JSP - Java Web Development Fundamentals
- The Complete Java Web Development Course
- Spring MVC For Beginners: Build Java Web App in 25 Steps
- Practical RESTful Web Services with Java EE 8 (JAX-RS 2.1)
Thanks!